 第六章 阻塞队列
# 一、基础概念
# 1.1 生产者消费者概念
生产者消费者是设计模式的一种。让生产者和消费者基于一个容器来解决强耦合问题。
生产者 消费者彼此之间不会直接通讯的,而是通过一个容器(队列)进行通讯。
所以生产者生产完数据后扔到容器中,不通用等待消费者来处理。
消费者不需要去找生产者要数据,直接从容器中获取即可。
而这种容器最常用的结构就是队列。
# 1.2 JUC阻塞队列的存取方法

阻塞队列(BlockingQueue) 是一个支持两个附加操作的队列。这两个附加的操作是:在队列为空时,获取元素的线程会等待队列变为非空。当队列满时,存储元素的线程会等待队列可用。阻塞队列常用于生产者和消费者的场景,生产者是往队列里添加元素的线程,消费者是从队列里拿元素的线程。阻塞队列就是生产者存放元素的容器,而消费者也只从容器里拿元素。
1.当进行入队操作的时候,队列为满,入队操作就阻塞,直到队列非满的时候入队操作才完成。
2.当进行出队操作的时候,队列为空,出队操作就阻塞,直到队列非空的时候出队操作才完成。
生产者存储方法
add(E)     	// 添加数据到队列,如果队列满了,无法存储,抛出异常
offer(E)    // 添加数据到队列,如果队列满了,返回false
offer(E,timeout,unit)   // 添加数据到队列,如果队列满了,阻塞timeout时间,如果阻塞一段时间,依然没添加进入,返回false
put(E)      // 添加数据到队列,如果队列满了,挂起线程,等到队列中有位置,再扔数据进去,死等!
2
3
4
消费者取数据方法
remove()    // 从队列中移除数据,如果队列为空,抛出异常
poll()      // 从队列中移除数据,如果队列为空,返回null,么的数据
poll(timeout,unit)   // 从队列中移除数据,如果队列为空,挂起线程timeout时间,等生产者扔数据,再获取
take()     // 从队列中移除数据,如果队列为空,线程挂起,一直等到生产者扔数据,再获取
2
3
4
# 二、ArrayBlockingQueue
# 2.1 ArrayBlockingQueue的基本使用
ArrayBlockingQueue在初始化的时候,必须指定当前队列的长度。
因为ArrayBlockingQueue是基于数组实现的队列结构,数组长度不可变,必须提前设置数组长度信息。
public static void main(String[] args) throws ExecutionException, InterruptedException, IOException {
    // 必须设置队列的长度
    ArrayBlockingQueue queue = new ArrayBlockingQueue(4);

    // 生产者扔数据
    queue.add("1");
    queue.offer("2");
    queue.offer("3",2,TimeUnit.SECONDS);
    queue.put("2");

    // 消费者取数据
    System.out.println(queue.remove());
    System.out.println(queue.poll());
    System.out.println(queue.poll(2,TimeUnit.SECONDS));
    System.out.println(queue.take());
}
2
3
4
5
6
7
8
9
10
11
12
13
14
15
16
# 2.2 生产者方法实现原理
生产者添加数据到队列的方法比较多,需要一个一个查看
# 2.2.1 ArrayBlockingQueue的常见属性
ArrayBlockingQueue中的成员变量
lock = 就是一个ReentrantLock
count = 就是当前数组中元素的个数
iterms = 就是数组本身
# 基于putIndex和takeIndex将数组结构实现为了队列结构
putIndex = 存储数据时的下标
takeIndex = 去数据时的下标
notEmpty = 消费者挂起线程和唤醒线程用到的Condition(看成sync的wait和notify)
notFull = 生产者挂起线程和唤醒线程用到的Condition(看成sync的wait和notify)
2
3
4
5
6
7
8
# 2.2.2 add方法实现
add方法本身就是调用了offer方法,如果offer方法返回false,直接抛出异常
public boolean add(E e) {
    if (offer(e))
        return true;
    else
        // 抛出的异常
        throw new IllegalStateException("Queue full");
}
2
3
4
5
6
7
# 2.2.3 offer方法实现
public boolean offer(E e) {
    // 要求存储的数据不允许为null,为null就抛出空指针
    checkNotNull(e);
    // 当前阻塞队列的lock锁
    final ReentrantLock lock = this.lock;
    // 为了保证线程安全,加锁
    lock.lock();
    try {
        // 如果队列中的元素已经存满了,
        if (count == items.length)
            // 返回false
            return false;
        else {
            // 队列没满,执行enqueue将元素添加到队列中
            enqueue(e);
            // 返回true
            return true;
        }
    } finally {
        // 操作完释放锁
        lock.unlock();
    }
}

//==========================================================
private void enqueue(E x) {
    // 拿到数组的引用
    final Object[] items = this.items;
    // 将元素放到指定位置
    items[putIndex] = x;
    // 对inputIndex进行++操作,并且判断是否已经等于数组长度,需要归位
    if (++putIndex == items.length)
        // 将索引设置为0
        putIndex = 0;
    // 元素添加成功,进行++操作。
    count++;
    // 将一个Condition中阻塞的线程唤醒。
    notEmpty.signal();
}
2
3
4
5
6
7
8
9
10
11
12
13
14
15
16
17
18
19
20
21
22
23
24
25
26
27
28
29
30
31
32
33
34
35
36
37
38
39
# 2.2.4 offer(time,unit)方法
生产者在添加数据时,如果队列已经满了,阻塞一会。
- 阻塞到消费者消费了消息,然后唤醒当前阻塞线程
- 阻塞到了time时间,再次判断是否可以添加,不能,直接告辞。
// 如果线程在挂起的时候,如果对当前阻塞线程的中断标记位进行设置,此时会抛出异常直接结束
public boolean offer(E e, long timeout, TimeUnit unit) throws InterruptedException {
	// 非空检验
    checkNotNull(e);
    // 将时间单位转换为纳秒
    long nanos = unit.toNanos(timeout);
    // 加锁
    final ReentrantLock lock = this.lock;
    // 允许线程中断并排除异常的加锁方式
    lock.lockInterruptibly();
    try {
        // 为什么是while(虚假唤醒)
        // 如果元素个数和数组长度一致,队列慢了
        while (count == items.length) {
            // 判断等待的时间是否还充裕
            if (nanos <= 0)
                // 不充裕,直接添加失败
                return false;
            // 挂起等待,会同时释放锁资源(对标sync的wait方法)
            // awaitNanos会挂起线程,并且返回剩余的阻塞时间
            // 恢复执行时,需要重新获取锁资源
            nanos = notFull.awaitNanos(nanos);
        }
        // 说明队列有空间了,enqueue将数据扔到阻塞队列中
        enqueue(e);
        return true;
    } finally {
        // 释放锁资源
        lock.unlock();
    }
}
2
3
4
5
6
7
8
9
10
11
12
13
14
15
16
17
18
19
20
21
22
23
24
25
26
27
28
29
30
31
# 2.2.5 put方法
如果队列是满的, 就一直挂起,直到被唤醒,或者被中断
public void put(E e) throws InterruptedException {
    checkNotNull(e);
    final ReentrantLock lock = this.lock;
    lock.lockInterruptibly();
    try {
        while (count == items.length)
            // await方法一直阻塞,直到被唤醒或者中断标记位
            notFull.await();
        enqueue(e);
    } finally {
        lock.unlock();
    }
}
2
3
4
5
6
7
8
9
10
11
12
13
# 2.3 消费者方法实现原理
# 2.3.1 remove方法
// remove方法就是调用了poll
public E remove() {
    E x = poll();
    // 如果有数据,直接返回
    if (x != null)
        return x;
    // 没数据抛出异常
    else
        throw new NoSuchElementException();
}
2
3
4
5
6
7
8
9
10
# 2.4.2 poll方法
// 拉取数据
public E poll() {
    // 加锁操作
    final ReentrantLock lock = this.lock;
    lock.lock();
    try {
        // 如果没有数据,直接返回null,如果有数据,执行dequeue,取出数据并返回
        return (count == 0) ? null : dequeue();
    } finally {
        lock.unlock();
    }
}

//==========================================================
// 取出数据
private E dequeue() {
    // 将成员变量引用到局部变量
    final Object[] items = this.items;
    // 直接获取指定索引位置的数据
    E x = (E) items[takeIndex];
    // 将数组上指定索引位置设置为null
    items[takeIndex] = null;
    // 设置下次取数据时的索引位置
    if (++takeIndex == items.length)
        takeIndex = 0;
    // 对count进行--操作
    count--;
    // 迭代器内容,先跳过
    if (itrs != null)
        itrs.elementDequeued();
    // signal方法,会唤醒当前Condition中排队的一个Node。
    // signalAll方法,会将Condition中所有的Node,全都唤醒
    notFull.signal();
    // 返回数据。
    return x;
}
2
3
4
5
6
7
8
9
10
11
12
13
14
15
16
17
18
19
20
21
22
23
24
25
26
27
28
29
30
31
32
33
34
35
36
# 2.4.3 poll(time,unit)方法
public E poll(long timeout, TimeUnit unit) throws InterruptedException {
    // 转换时间单位
    long nanos = unit.toNanos(timeout);
    // 竞争锁
    final ReentrantLock lock = this.lock;
    lock.lockInterruptibly();
    try {
        // 如果没有数据
        while (count == 0) {
            if (nanos <= 0)
                // 没数据,也无法阻塞了,返回null
                return null;
            // 没数据,挂起消费者线程
            nanos = notEmpty.awaitNanos(nanos);
        }
        // 取数据
        return dequeue();
    } finally {
        lock.unlock();
    }
}
2
3
4
5
6
7
8
9
10
11
12
13
14
15
16
17
18
19
20
21
# 2.4.4 take方法
public E take() throws InterruptedException {
    final ReentrantLock lock = this.lock;
    lock.lockInterruptibly();
    try {
        // 虚假唤醒
        while (count == 0)
            notEmpty.await();
        return dequeue();
    } finally {
        lock.unlock();
    }
}
2
3
4
5
6
7
8
9
10
11
12
# 2.4.5 虚假唤醒
阻塞队列中,如果需要线程挂起操作,判断有无数据的位置采用的是while循环 ,为什么不能换成if
肯定是不能换成if逻辑判断
线程A,线程B,线程E,线程C。 其中ABE生产者,C属于消费者
假如线程的队列是满的
// E,拿到锁资源,还没有走while判断
while (count == items.length)
    // A醒了
    // B挂起
    notFull.await();
enqueue(e);
2
3
4
5
6
C此时消费一条数据,执行notFull.signal()唤醒一个线程,A线程被唤醒
E走判断,发现有空余位置,可以添加数据到队列,E添加数据,走enqueue
如果判断是if,A在E释放锁资源后,拿到锁资源,直接走enqueue方法。
此时A线程就是在putIndex的位置,覆盖掉之前的数据,造成数据安全问题
# 三、LinkedBlockingQueue
# 3.1 LinkedBlockingQueue的底层实现
查看LinkedBlockingQueue是如何存储数据,并且实现链表结构的。
// Node对象就是存储数据的单位
static class Node<E> {
    // 存储的数据
    E item;
	// 指向下一个数据的指针
    Node<E> next;
	// 有参构造
    Node(E x) { item = x; }
}
2
3
4
5
6
7
8
9
查看LinkedBlockingQueue的有参构造
// 可以手动指定LinkedBlockingQueue的长度,如果没有指定,默认为Integer.MAX_VALUE
public LinkedBlockingQueue(int capacity) {
    if (capacity <= 0) throw new IllegalArgumentException();
    this.capacity = capacity;
    // 在初始化时,构建一个item为null的节点,作为head和last
	 // 这种node可以成为哨兵Node,
    // 如果没有哨兵节点,那么在获取数据时,需要判断head是否为null,才能找next
    // 如果没有哨兵节点,那么在添加数据时,需要判断last是否为null,才能找next
    last = head = new Node<E>(null);
}
2
3
4
5
6
7
8
9
10
查看LinkedBlockingQueue的其他属性
// 因为是链表,没有想数组的length属性,基于AtomicInteger来记录长度
private final AtomicInteger count = new AtomicInteger();
// 链表的头,取
transient Node<E> head;
// 链表的尾,存
private transient Node<E> last;
// 消费者的锁
private final ReentrantLock takeLock = new ReentrantLock();
// 消费者的挂起操作,以及唤醒用的condition
private final Condition notEmpty = takeLock.newCondition();
// 生产者的锁
private final ReentrantLock putLock = new ReentrantLock();
// 生产者的挂起操作,以及唤醒用的condition
private final Condition notFull = putLock.newCondition();
2
3
4
5
6
7
8
9
10
11
12
13
14
# 3.2 生产者方法实现原理
# 3.2.1 add方法
你懂得,还是走offer方法
public boolean add(E e) {
    if (offer(e))
        return true;
    else
        throw new IllegalStateException("Queue full");
}
2
3
4
5
6
# 3.2.2 offer方法
public boolean offer(E e) {
    // 非空校验
    if (e == null) throw new NullPointerException();
    // 拿到存储数据条数的count
    final AtomicInteger count = this.count;
    // 查看当前数据条数,是否等于队列限制长度,达到了这个长度,直接返回false
    if (count.get() == capacity)
        return false;
    // 声明c,作为标记存在
    int c = -1;
    // 将存储的数据封装为Node对象
    Node<E> node = new Node<E>(e);
    // 获取生产者的锁。
    final ReentrantLock putLock = this.putLock;
    // 竞争锁资源
    putLock.lock();
    try {
        // 再次做一个判断,查看是否还有空间
        if (count.get() < capacity) {
            // enqueue,扔数据
            enqueue(node);
            // 将数据个数 + 1
            c = count.getAndIncrement();
            // 拿到count的值 小于 长度限制
            // 有生产者在基于await挂起,这里添加完数据后,发现还有空间可以存储数据,
            // 唤醒前面可能已经挂起的生产者
            // 因为这里生产者和消费者不是互斥的,写操作进行的同时,可能也有消费者在消费数据。
            if (c + 1 < capacity)
                // 唤醒生产者
                notFull.signal();
        }
    } finally {
        // 释放锁资源
        putLock.unlock();
    }
    // 如果c == 0,代表添加数据之前,队列元素个数是0个。
    // 如果有消费者在队列没有数据的时候,来消费,此时消费者一定会挂起线程
    if (c == 0)
        // 唤醒消费者
        signalNotEmpty();
    // 添加成功返回true,失败返回-1
    return c >= 0;
}

//================================================
private void enqueue(Node<E> node) {
    // 将当前Node设置为last的next,并且再将当前Node作为last
    last = last.next = node;
}
//================================================
private void signalNotEmpty() {
    // 获取读锁
    final ReentrantLock takeLock = this.takeLock;
    takeLock.lock();
    try {
        // 唤醒。
        notEmpty.signal();
    } finally {
        takeLock.unlock();
    }
}
sync -> wait / notify
2
3
4
5
6
7
8
9
10
11
12
13
14
15
16
17
18
19
20
21
22
23
24
25
26
27
28
29
30
31
32
33
34
35
36
37
38
39
40
41
42
43
44
45
46
47
48
49
50
51
52
53
54
55
56
57
58
59
60
61
62
# 3.2.3 offer(time,unit)方法
public boolean offer(E e, long timeout, TimeUnit unit) throws InterruptedException {
	 // 非空检验
    if (e == null) throw new NullPointerException();
    // 将时间转换为纳秒
    long nanos = unit.toNanos(timeout);
    // 标记
    int c = -1;
    // 写锁,数据条数
    final ReentrantLock putLock = this.putLock;
    final AtomicInteger count = this.count;
    // 允许中断的加锁方式
    putLock.lockInterruptibly();
    try {
        // 如果元素个数和限制个数一致,直接准备挂起
        while (count.get() == capacity) {
            // 挂起的时间是不是已经没了
            if (nanos <= 0)
                // 添加失败,返回false
                return false;
            // 挂起线程
            nanos = notFull.awaitNanos(nanos);
        }
        // 有空余位置,enqueue添加数据
        enqueue(new Node<E>(e));
        // 元素个数 + 1
        c = count.getAndIncrement();
        // 当前添加完数据,还有位置可以添加数据,唤醒可能阻塞的生产者
        if (c + 1 < capacity)
            notFull.signal();
    } finally {
        // 释放锁
        putLock.unlock();
    }
    // 如果之前元素个数是0,唤醒可能等待的消费者
    if (c == 0)
        signalNotEmpty();
    return true;
}
2
3
4
5
6
7
8
9
10
11
12
13
14
15
16
17
18
19
20
21
22
23
24
25
26
27
28
29
30
31
32
33
34
35
36
37
38
# 3.2.4 put方法
public void put(E e) throws InterruptedException {
    if (e == null) throw new NullPointerException();
    int c = -1;
    Node<E> node = new Node<E>(e);
    final ReentrantLock putLock = this.putLock;
    final AtomicInteger count = this.count;
    putLock.lockInterruptibly();
    try {
        while (count.get() == capacity) {
            // 一直挂起线程,等待被唤醒
            notFull.await();
        }
        enqueue(node);
        c = count.getAndIncrement();
        if (c + 1 < capacity)
            notFull.signal();
    } finally {
        putLock.unlock();
    }
    if (c == 0)
        signalNotEmpty();
}
2
3
4
5
6
7
8
9
10
11
12
13
14
15
16
17
18
19
20
21
22
# 3.3 消费者方法实现原理
从remove方法开始,查看消费者获取数据的方式
# 3.3.1 remove方法
public E remove() {
    E x = poll();
    if (x != null)
        return x;
    else
        throw new NoSuchElementException();
}
2
3
4
5
6
7
# 3.3.2 poll方法
public E poll() {
    // 拿到队列数据个数的计数器
    final AtomicInteger count = this.count;
    // 当前队列中数据是否0
    if (count.get() == 0)
        // 说明队列没数据,直接返回null即可
        return null;
    // 声明返回结果
    E x = null;
    // 标记
    int c = -1;
    // 获取消费者的takeLock
    final ReentrantLock takeLock = this.takeLock;
    // 加锁
    takeLock.lock();
    try {
        // 基于DCL,确保当前队列中依然有元素
        if (count.get() > 0) {
            // 从队列中移除数据
            x = dequeue();
            // 将之前的元素个数获取,并--
            c = count.getAndDecrement();
            if (c > 1)
                // 如果依然有数据,继续唤醒await的消费者。
                notEmpty.signal();
        }
    } finally {
        // 释放锁资源
        takeLock.unlock();
    }
    // 如果之前的元素个数为当前队列的限制长度,
    // 现在消费者消费了一个数据,多了一个空位可以添加
    if (c == capacity)
        // 唤醒阻塞的生产者
        signalNotFull();
    return x;
}

//================================================

private E dequeue() {
    // 拿到队列的head位置数据
    Node<E> h = head;
    // 拿到了head的next,因为这个是哨兵Node,需要拿到的head.next的数据
    Node<E> first = h.next;
    // 将之前的哨兵Node.next置位null。help GC。
    h.next = h;
    // 将first置位新的head
    head = first;
    // 拿到返回结果first节点的item数据,也就是之前head.next.item
    E x = first.item;
    // 将first数据置位null,作为新的head
    first.item = null;
    // 返回数据
    return x;
}

//================================================

private void signalNotFull() {
    final ReentrantLock putLock = this.putLock;
    putLock.lock();
    try {
        // 唤醒生产者。
        notFull.signal();
    } finally {
        putLock.unlock();
    }
}
2
3
4
5
6
7
8
9
10
11
12
13
14
15
16
17
18
19
20
21
22
23
24
25
26
27
28
29
30
31
32
33
34
35
36
37
38
39
40
41
42
43
44
45
46
47
48
49
50
51
52
53
54
55
56
57
58
59
60
61
62
63
64
65
66
67
68
69
# 3.3.3 poll(time,unit)方法
public E poll(long timeout, TimeUnit unit) throws InterruptedException {
    // 返回结果
    E x = null;
    // 标识
    int c = -1;
    // 将挂起实现设置为纳秒级别
    long nanos = unit.toNanos(timeout);
    // 拿到计数器
    final AtomicInteger count = this.count;
    // take锁加锁
    final ReentrantLock takeLock = this.takeLock;
    takeLock.lockInterruptibly();
    try {
        // 如果没数据,进到while
        while (count.get() == 0) {
            if (nanos <= 0)
                return null;
            // 挂起当前线程
            nanos = notEmpty.awaitNanos(nanos);
        }
        // 剩下内容,和之前一样。
        x = dequeue();
        c = count.getAndDecrement();
        if (c > 1)
            notEmpty.signal();
    } finally {
        takeLock.unlock();
    }
    if (c == capacity)
        signalNotFull();
    return x;
}
2
3
4
5
6
7
8
9
10
11
12
13
14
15
16
17
18
19
20
21
22
23
24
25
26
27
28
29
30
31
32
# 3.3.4 take方法
public E take() throws InterruptedException {
    E x;
    int c = -1;
    final AtomicInteger count = this.count;
    final ReentrantLock takeLock = this.takeLock;
    takeLock.lockInterruptibly();
    try {
        // 相比poll(time,unit)方法,这里的出口只有一个,就是中断标记位,抛出异常,否则一直等待
        while (count.get() == 0) {
            notEmpty.await();
        }
        x = dequeue();
        c = count.getAndDecrement();
        if (c > 1)
            notEmpty.signal();
    } finally {
        takeLock.unlock();
    }
    if (c == capacity)
        signalNotFull();
    return x;
}
2
3
4
5
6
7
8
9
10
11
12
13
14
15
16
17
18
19
20
21
22
# 四、PriorityBlockingQueue概念
# 4.1 PriorityBlockingQueue介绍
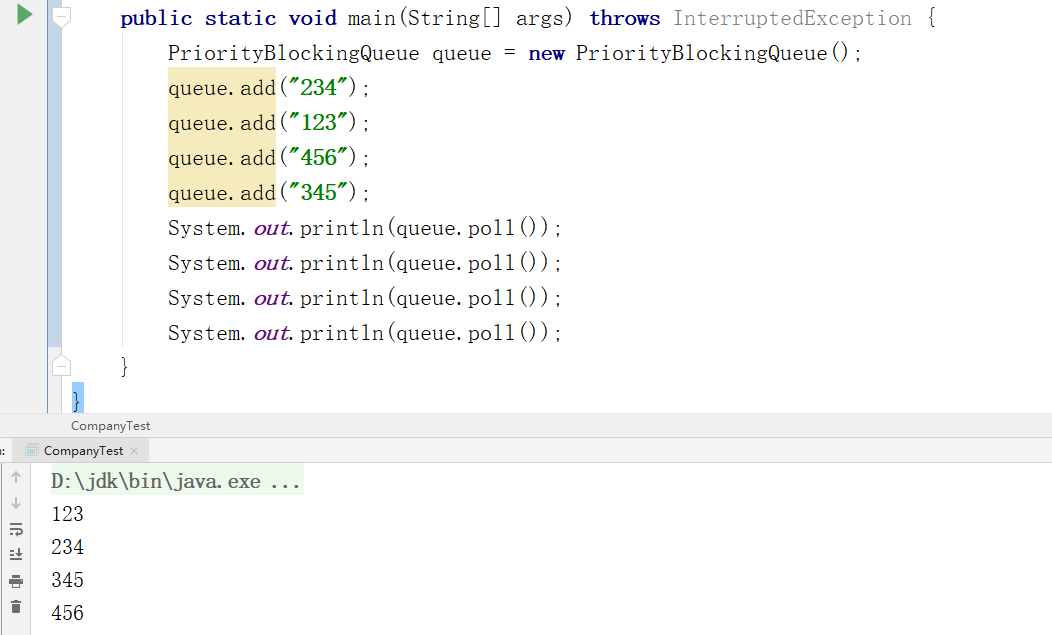
首先PriorityBlockingQueue是一个优先级队列,他不满足先进先出的概念。
会将查询的数据进行排序,排序的方式就是基于插入数据值的本身。
如果是自定义对象必须要实现Comparable接口才可以添加到优先级队列
排序的方式是基于二叉堆实现的。底层是采用数据结构实现的二叉堆。
# 4.2 二叉堆结构介绍
优先级队列PriorityBlockingQueue基于二叉堆实现的。
private transient Object[] queue;
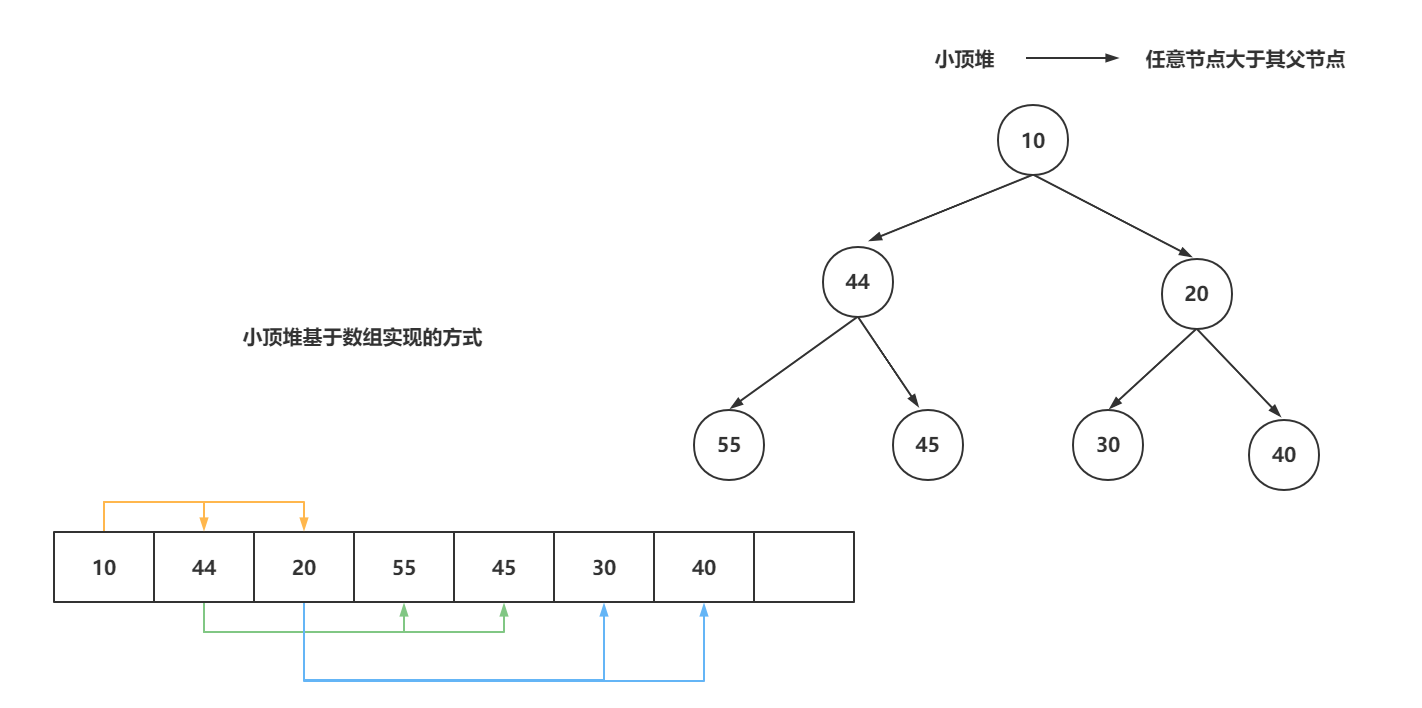
PriorityBlockingQueue是基于数组实现的二叉堆。
二叉堆是什么?
- 二叉堆就是一个完整的二叉树。
- 任意一个节点大于父节点或者小于父节点
- 基于同步的方式,可以定义出小顶堆和大顶堆
小顶堆以及小顶堆基于数据实现的方式。
# 4.3 PriorityBlockingQueue核心属性
// 数组的初始长度
private static final int DEFAULT_INITIAL_CAPACITY = 11;

// 数组的最大长度
// -8的目的是为了适配各个版本的虚拟机
// 默认当前使用的hotspot虚拟机最大支持Integer.MAX_VALUE - 2,但是其他版本的虚拟机不一定。
private static final int MAX_ARRAY_SIZE = Integer.MAX_VALUE - 8;

// 存储数据的数组,也是基于这个数组实现的二叉堆。
private transient Object[] queue;

// size记录当前阻塞队列中元素的个数
private transient int size;

// 要求使用的对象要实现Comparable比较器。基于comparator做对象之间的比较
private transient Comparator<? super E> comparator;

// 实现阻塞队列的lock锁
private final ReentrantLock lock;

// 挂起线程操作。
private final Condition notEmpty;

// 因为PriorityBlockingQueue的底层是基于二叉堆的,而二叉堆又是基于数组实现的,数组长度是固定的,如果需要扩容,需要构建一个新数组。PriorityBlockingQueue在做扩容操作时,不会lock住的,释放lock锁,基于allocationSpinLock属性做标记,来避免出现并发扩容的问题。
private transient volatile int allocationSpinLock;

// 阻塞队列中用到的原理,其实就是普通的优先级队列。
private PriorityQueue<E> q;
2
3
4
5
6
7
8
9
10
11
12
13
14
15
16
17
18
19
20
21
22
23
24
25
26
27
28
# 4.4 PriorityBlockingQueue的写入操作
毕竟是阻塞队列,添加数据的操作,咱们是很了解,无法还是add,offer,offer(time,unit),put。但是因为优先级队列中,数组是可以扩容的,虽然有长度限制,但是依然属于无界队列的概念,所以生产者不会阻塞,所以只有offer方法可以查看。
这次核心的内容并不是添加数据的区别。主要关注的是如何保证二叉堆中小顶堆的结构的,并且还要查看数组扩容的一个过程是怎样的。
# 4.4.1 offer基本流程
因为add方法依然调用的是offer方法,直接查看offer方法即可
public boolean offer(E e) {
    // 非空判断。
    if (e == null)
        throw new NullPointerException();
    // 拿到锁,直接上锁
    final ReentrantLock lock = this.lock;
    lock.lock();
    // n:size,元素的个数
    // cap:当前数组的长度
    // array:就是存储数据的数组
    int n, cap;
    Object[] array;
    while ((n = size) >= (cap = (array = queue).length))
        // 如果元素个数大于等于数组的长度,需要尝试扩容。
        tryGrow(array, cap);
    try {
        // 拿到了比较器
        Comparator<? super E> cmp = comparator;
        // 比较数据大小,存储数据,是否需要做上移操作,保证平衡的
        if (cmp == null)
            siftUpComparable(n, e, array);
        else
            siftUpUsingComparator(n, e, array, cmp);
        // 元素个数 + 1
        size = n + 1;
        // 如果有挂起的线程,需要去唤醒挂起的消费者。
        notEmpty.signal();
    } finally {
        // 释放锁
        lock.unlock();
    }
    // 返回true
    return true;
}
2
3
4
5
6
7
8
9
10
11
12
13
14
15
16
17
18
19
20
21
22
23
24
25
26
27
28
29
30
31
32
33
34
# 4.4.2 offer扩容操作
在添加数据之前,会采用while循环的方式,来判断当前元素个数是否大于等于数组长度。如果满足,需要执行tryGrow方法,对数组进行扩容
如果两个线程同时执行tryGrow,只会有一个线程在扩容,另一个线程可能多次走while循环,多次走tryGrow方法,但是依然需要等待前面的线程扩容完毕。
private void tryGrow(Object[] array, int oldCap) {
    // 释放锁资源。
    lock.unlock();
    // 声明新数组。
    Object[] newArray = null;
    // 如果allocationSpinLock属性值为0,说明当前没有线程正在扩容的。
    if (allocationSpinLock == 0 &&
        // 基于CAS的方式,将allocationSpinLock从0修改为1,代表当前线程可以开始扩容
        UNSAFE.compareAndSwapInt(this, allocationSpinLockOffset,0, 1)) {
        try {
            // 计算新数组长度
            int newCap = oldCap + ((oldCap < 64) ?
                                   // 如果数组长度比较小,这里加快扩容长度速度。
                                   (oldCap + 2) :
                                   // 如果长度大于等于64了,每次扩容到1.5倍即可。
                                   (oldCap >> 1));
            // 如果新数组长度大于MAX_ARRAY_SIZE,需要做点事了。
            if (newCap - MAX_ARRAY_SIZE > 0) {
                // 声明minCap,长度为老数组 + 1
                int minCap = oldCap + 1;
                // 老数组+1变为负数,或者老数组长度已经大于MAX_ARRAY_SIZE了,无法扩容了。
                if (minCap < 0 || minCap > MAX_ARRAY_SIZE)
                    // 告辞,凉凉~~~~
                    throw new OutOfMemoryError();
                // 如果没有超过限制,直接设置为最大长度即可
                newCap = MAX_ARRAY_SIZE;
            }
            // 新数组长度,得大于老数组长度,
            // 第二个判断确保没有并发扩容的出现。
            if (newCap > oldCap && queue == array)
                // 构建出新数组
                newArray = new Object[newCap];
        } finally {
            // 新数组有了,标记位归0~~
            allocationSpinLock = 0;
        }
    }
    // 如果到了这,newArray依然为null,说明这个线程没有进到if方法中,去构建新数组
    if (newArray == null)
        // 稍微等一手。
        Thread.yield();
    // 拿锁资源,
    lock.lock();
    // 拿到锁资源后,确认是构建了新数组的线程,这里就需要将新数组复制给queue,并且导入数据
    if (newArray != null && queue == array) {
        // 将新数组赋值给queue
        queue = newArray;
        // 将老数组的数据全部导入到新数组中。
        System.arraycopy(array, 0, newArray, 0, oldCap);
    }
}
2
3
4
5
6
7
8
9
10
11
12
13
14
15
16
17
18
19
20
21
22
23
24
25
26
27
28
29
30
31
32
33
34
35
36
37
38
39
40
41
42
43
44
45
46
47
48
49
50
51
# 4.4.3 offer添加数据
这里是数据如何放到数组上,并且如何保证的二叉堆结构
// k:当前元素的个数(其实就是要放的索引位置)
// x:需要添加的数据
// array:数组。。
private static <T> void siftUpComparable(int k, T x, Object[] array) {
    // 将插入的元素直接强转为Comparable(com.mashibing.User cannot be cast to java.lang.Comparable)
    // 这行强转,会导致添加没有实现Comparable的元素,直接报错。
    Comparable<? super T> key = (Comparable<? super T>) x;
    // k大于0,走while逻辑。(原来有数据)
    while (k > 0) {
        // 获取父节点的索引位置。
        int parent = (k - 1) >>> 1;
        // 拿到父节点的元素。
        Object e = array[parent];
        // 用子节点compareTo父节点,如果 >= 0,说明当前son节点比parent要大。
        if (key.compareTo((T) e) >= 0)
            // 直接break,完事,
            break;
        // 将son节点的位置设置上之前的parent节点
        array[k] = e;
        // 重新设置x节点需要放置的位置。
        k = parent;
    }
    // k == 0,当前元素是第一个元素,直接插入进去。
    array[k] = key;
}
2
3
4
5
6
7
8
9
10
11
12
13
14
15
16
17
18
19
20
21
22
23
24
25
# 4.5 PriorityBlockingQueue的读取操作
读取操作是存储现在挂起的情况的,因为如果数组中元素个数为0,当前线程如果执行了take方法,必然需要挂起。
其次获取数据,因为是优先级队列,所以需要从二叉堆栈顶拿数据,直接拿索引为0的数据即可,但是拿完之后,需要保持二叉堆结构,所以会有下移操作。
# 4.5.1 查看获取方法流程
poll:
public E poll() {
    final ReentrantLock lock = this.lock;
    // 加锁
    lock.lock();
    try {
        // 拿到返回数据,没拿到,返回null
        return dequeue();
    } finally {
        lock.unlock();
    }
}
2
3
4
5
6
7
8
9
10
11
poll(time,unit):
public E poll(long timeout, TimeUnit unit) throws InterruptedException {
    // 将挂起的时间转换为纳秒
    long nanos = unit.toNanos(timeout);
    final ReentrantLock lock = this.lock;
    // 允许线程中断抛异常的加锁
    lock.lockInterruptibly();
    // 声明结果
    E result;
    try {
        // dequeue是去拿数据的,可能会出现拿到的数据为null,如果为null,同时挂起时间还有剩余,这边就直接通过notEmpty挂起线程
        while ( (result = dequeue()) == null && nanos > 0)
            nanos = notEmpty.awaitNanos(nanos);
    } finally {
        lock.unlock();
    }
    // 有数据正常返回,没数据,告辞~
    return result;
}
2
3
4
5
6
7
8
9
10
11
12
13
14
15
16
17
18
take:
public E take() throws InterruptedException {
    final ReentrantLock lock = this.lock;
    lock.lockInterruptibly();
    E result;
    try {
        while ( (result = dequeue()) == null)
            // 无线等,要么有数据,要么中断线程
            notEmpty.await();
    } finally {
        lock.unlock();
    }
    return result;
}
2
3
4
5
6
7
8
9
10
11
12
13
# 4.5.2 查看dequeue获取数据
获取数据主要就是从数组中拿到0索引位置数据,然后保持二叉堆结构
private E dequeue() {
    // 将元素个数-1,拿到了索引位置。
    int n = size - 1;
    // 判断是不是木有数据了,没数据直接返回null即可
    if (n < 0)
        return null;
    // 说明有数据
    else {
        // 拿到数组,array
        Object[] array = queue;
        // 拿到0索引位置的数据
        E result = (E) array[0];
        // 拿到最后一个数据
        E x = (E) array[n];
        // 将最后一个位置置位null
        array[n] = null;
        Comparator<? super E> cmp = comparator;
        if (cmp == null)
            siftDownComparable(0, x, array, n);
        else
            siftDownUsingComparator(0, x, array, n, cmp);
        // 元素个数-1,赋值size
        size = n;
        // 返回result
        return result;
    }
}
2
3
4
5
6
7
8
9
10
11
12
13
14
15
16
17
18
19
20
21
22
23
24
25
26
27
# 4.6.3 下移做平衡操作
一定要以局部的方式去查看树结构的变化,他是从跟节点往下找较小的一个子节点,将较小的子节点挪动到父节点位置,再将循环往下走,如果一来,整个二叉堆的结构就可以保证了。
// k:默认进来是0
// x:代表二叉堆的最后一个数据
// array:数组
// n:最后一个索引
private static <T> void siftDownComparable(int k, T x, Object[] array,int n) {
    // 健壮性校验,取完第一个数据,已经没数据了,那就不需要做平衡操作
    if (n > 0) {
        // 拿到最后一个数据的比较器
        Comparable<? super T> key = (Comparable<? super T>)x;
        // 因为二叉堆是一个二叉满树,所以在保证二叉堆结构时,只需要做一半就可以
        int half = n >>> 1;
        // 做了超过一半,就不需要再往下找了。
        while (k < half) {
            // 找左子节点索引,一个公式,可以找到当前节点的左子节点
            int child = (k << 1) + 1;
            // 拿到左子节点的数据
            Object c = array[child];
            // 拿到右子节点索引
            int right = child + 1;
            // 确认有右子节点
            // 判断左节点是否大于右节点
            if (right < n && c.compareTo(array[right]) > 0)
                // 如果左大于右,那么c就执行右
                c = array[child = right];
            // 比较最后一个节点是否小于当前的较小的子节点
            if (key.compareTo((T) c) <= 0)
                break;
            // 将左右子节点较小的放到之前的父节点位置
            array[k] = c;
            // k重置到之前的子节点位置
            k = child;
        }
        // 上面while循环搞定后,可以确认整个二叉堆中,数据已经移动ok了,只差当前k的位置数据是null
        // 将最后一个索引的数据放到k的位置
        array[k] = key;
    }
}
2
3
4
5
6
7
8
9
10
11
12
13
14
15
16
17
18
19
20
21
22
23
24
25
26
27
28
29
30
31
32
33
34
35
36
37
# 五、DelayQueue
# 5.1 DelayQueue介绍&应用
DelayQueue就是一个延迟队列,生产者写入一个消息,这个消息还有直接被消费的延迟时间。
需要让消息具有延迟的特性。
DelayQueue也是基于二叉堆结构实现的,甚至本事就是基于PriorityQueue实现的功能。二叉堆结构每次获取的是栈顶的数据,需要让DelayQueue中的数据,在比较时,跟根据延迟时间做比较,剩余时间最短的要放在栈顶。
查看DelayQueue类信息:
public class DelayQueue<E extends Delayed> extends AbstractQueue<E> implements BlockingQueue<E> {
    // 发现DelayQueue中的元素,需要继承Delayed接口。
}
// ==========================================
// 接口继承了Comparable,这样就具备了比较的能力。
public interface Delayed extends Comparable<Delayed> {
    // 抽象方法,就是咱们需要设置的延迟时间
    long getDelay(TimeUnit unit);

    // Comparable接口提供的:public int compareTo(T o);
}
2
3
4
5
6
7
8
9
10
11
基于上述特点,声明一个可以写入DelayQueue的元素类
public class Task implements Delayed {

    /** 任务的名称 */
    private String name;

    /** 什么时间点执行 */
    private Long time;

    /**
     *
     * @param name
     * @param delay  单位毫秒。
     */
    public Task(String name, Long delay) {
        // 任务名称
        this.name = name;
        this.time = System.currentTimeMillis() + delay;
    }

    /**
     * 设置任务什么时候可以出延迟队列
     * @param unit
     * @return
     */
    @Override
    public long getDelay(TimeUnit unit) {
		// 单位是毫秒,视频里写错了,写成了纳秒,
        return unit.convert(time - System.currentTimeMillis(),TimeUnit.MILLISECONDS);
    }

    /**
     * 两个任务在插入到延迟队列时的比较方式
     * @param o
     * @return
     */
    @Override
    public int compareTo(Delayed o) {
        return (int) (this.time - ((Task)o).getTime());
    }
}
2
3
4
5
6
7
8
9
10
11
12
13
14
15
16
17
18
19
20
21
22
23
24
25
26
27
28
29
30
31
32
33
34
35
36
37
38
39
40
在使用时,查看到DelayQueue底层用了PriorityQueue,在一定程度上,DelayQueue也是无界队列。
测试效果
public static void main(String[] args) throws InterruptedException {
    // 声明元素
    Task task1 = new Task("A",1000L);
    Task task2 = new Task("B",5000L);
    Task task3 = new Task("C",3000L);
    Task task4 = new Task("D",2000L);
    // 声明阻塞队列
    DelayQueue<Task> queue = new DelayQueue<>();
    // 将元素添加到延迟队列中
    queue.put(task1);
    queue.put(task2);
    queue.put(task3);
    queue.put(task4);
    // 获取元素
    System.out.println(queue.take());
    System.out.println(queue.take());
    System.out.println(queue.take());
    System.out.println(queue.take());
    // A,D,C,B
}
2
3
4
5
6
7
8
9
10
11
12
13
14
15
16
17
18
19
20
在应用时,外卖,15分钟商家需要节点,如果不节点,这个订单自动取消。
可以每下一个订单,就放到延迟队列中,如果规定时间内,商家没有节点,直接通过消费者获取元素,然后取消订单。
只要是有需要延迟一定时间后,再执行的任务,就可以通过延迟队列去实现。
# 5.2、DelayQueue核心属性
可以查看到DelayQueue就四个核心属性
// 因为DelayQueue依然属于阻塞队列,需要保证线程安全。看到只有一把锁,生产者和消费者使用的是一个lock
private final transient ReentrantLock lock = new ReentrantLock();
// 因为DelayQueue还是基于二叉堆结构实现的,没有必要重新搞一个二叉堆,直接使用的PriorityQueue
private final PriorityQueue<E> q = new PriorityQueue<E>();
// leader一般会存储等待栈顶数据的消费者,在整体写入和消费的过程中,会设置的leader的一些判断。
private Thread leader = null;
// 生产者在插入数据时,不会阻塞的。当前的Condition就是给消费者用的
// 比如消费者在获取数据时,发现栈顶的数据还又没到延迟时间。
// 这个时候,咱们就需要将消费者线程挂起,阻塞一会,阻塞到元素到了延迟时间,或者是,生产者插入的元素到了栈顶,此时生产者会唤醒消费者。
private final Condition available = lock.newCondition();
2
3
4
5
6
7
8
9
10
# 5.3、DelayQueue写入流程分析
Delay是无界的,数组可以动态的扩容,不需要关注生产者的阻塞问题,他就没有阻塞问题。
这里只需要查看offer方法即可。
public boolean offer(E e) {
    // 直接获取lock,加锁。
    final ReentrantLock lock = this.lock;
    lock.lock();
    try {
        // 直接调用PriorityQueue的插入方法,这里会根据之前重写Delayed接口中的compareTo方法做排序,然后调整上移和下移操作。
        q.offer(e);
        // 调用优先级队列的peek方法,拿到堆顶的数据
        // 拿到堆顶数据后,判断是否是刚刚插入的元素
        if (q.peek() == e) {
            // leader赋值为null。在消费者的位置再提一嘴
            leader = null;
            // 唤醒消费者,避免刚刚插入的数据的延迟时间出现问题。
            available.signal();
        }
        // 插入成功,
        return true;
    } finally {
        // 释放锁
        lock.unlock();
    }
}
2
3
4
5
6
7
8
9
10
11
12
13
14
15
16
17
18
19
20
21
22
# 5.4、DelayQueue读取流程分析
消费者依然还是存在阻塞的情况,因为有两个情况
- 消费者要拿到栈顶数据,但是延迟时间还没到,此时消费者需要等待一会。
- 消费者要来拿数据,但是发现已经有消费者在等待栈顶数据了,这个后来的消费者也需要等待一会。
依然需要查看四个方法的实现
# 5.4.1 remove方法
// 依然是AbstractQueue提供的方法,有结果就返回,没结果扔异常
public E remove() {
    E x = poll();
    if (x != null)
        return x;
    else
        throw new NoSuchElementException();
}
2
3
4
5
6
7
8
# 5.4.2 poll方法
// poll是浅尝一下,不会阻塞消费者,能拿就拿,拿不到就拉倒
public E poll() {
    // 消费者和生产者是一把锁,先拿锁,加锁。
    final ReentrantLock lock = this.lock;
    lock.lock();
    try {
       	 // 拿到栈顶数据。
        E first = q.peek();
        // 如果元素为null,直接返回null
        // 如果getDelay方法返回的结果是大于0的,那说明当前元素还每到延迟时间,元素无法返回,返回null
        if (first == null || first.getDelay(NANOSECONDS) > 0)
            return null;
        else
            // 到这说明元素不为null,并且已经达到了延迟时间,直接调用优先级队列的poll方法
            return q.poll();
    } finally {
        // 释放锁。
        lock.unlock();
    }
}
2
3
4
5
6
7
8
9
10
11
12
13
14
15
16
17
18
19
20
# 5.4.3 poll(time,unit)方法
这个是允许阻塞的,并且指定一定的时间
public E poll(long timeout, TimeUnit unit) throws InterruptedException {
    // 先将时间转为纳秒
    long nanos = unit.toNanos(timeout);
    // 拿锁,加锁。
    final ReentrantLock lock = this.lock;
    lock.lockInterruptibly();
    try {
        // 死循环。
        for (;;) {
            // 拿到堆顶数据
            E first = q.peek();
            // 如果元素为null
            if (first == null) {
                // 并且等待的时间小于等于0。不能等了,直接返回null
                if (nanos <= 0)
                    return null;
                // 说明当前线程还有可以阻塞的时间,阻塞指定时间即可。
                else
                    // 这里挂起线程后,说明队列没有元素,在生产者添加数据之后,会唤醒
                    nanos = available.awaitNanos(nanos);
            // 到这说明,有数据
            } else {
                // 有数据的话,先获取数据现在是否可以执行,延迟时间是否已经到了指定时间
                long delay = first.getDelay(NANOSECONDS);
                // 延迟时间是否已经到了,
                if (delay <= 0)
                    // 时间到了,直接执行优先级队列的poll方法,返回元素
                    return q.poll();
                // ==================延迟时间没到,消费者需要等一会===================
                // 这个是查看消费者可以等待的时间,
                if (nanos <= 0)
                    // 直接返回nulll
                    return null;
                // ==================延迟时间没到,消费者可以等一会===================
                // 把first赋值为null
                first = null;
                // 如果等待的时间,小于元素剩余的延迟时间,消费者直接挂起。反正暂时拿不到,但是不能保证后续是否有生产者添加一个新的数据,我是可以拿到的。
                // 如果已经有一个消费者在等待堆顶数据了,我这边不做额外操作,直接挂起即可。
                if (nanos < delay || leader != null)
                    nanos = available.awaitNanos(nanos);
                // 当前消费者的阻塞时间可以拿到数据,并且没有其他消费者在等待堆顶数据
                else {
                    // 拿到当前消费者的线程对象
                    Thread thisThread = Thread.currentThread();
                    // 将leader设置为当前线程
                    leader = thisThread;
                    try {
                        // 会让当前消费者,阻塞这个元素的延迟时间
                        long timeLeft = available.awaitNanos(delay);
                        // 重新计算当前消费者剩余的可阻塞时间,。
                        nanos -= delay - timeLeft;
                    } finally {
                        // 到了时间,将leader设置为null
                        if (leader == thisThread)
                            leader = null;
                    }
                }
            }
        }
    } finally {
        // 没有消费者在等待元素,队列中的元素不为null
        if (leader == null && q.peek() != null)
            // 只要当前没有leader在等,并且队列有元素,就需要再次唤醒消费者。、
            // 避免队列有元素,但是没有消费者处理的问题
            available.signal();
        // 释放锁
        lock.unlock();
    }
}
2
3
4
5
6
7
8
9
10
11
12
13
14
15
16
17
18
19
20
21
22
23
24
25
26
27
28
29
30
31
32
33
34
35
36
37
38
39
40
41
42
43
44
45
46
47
48
49
50
51
52
53
54
55
56
57
58
59
60
61
62
63
64
65
66
67
68
69
# 5.4.4 take方法
这个是允许阻塞的,但是可以一直等,要么等到元素,要么等到被中断。
public E take() throws InterruptedException {
    // 正常加锁,并且允许中断
    final ReentrantLock lock = this.lock;
    lock.lockInterruptibly();
    try {
        for (;;) {
            // 拿到元素
            E first = q.peek();
            if (first == null)
                // 没有元素挂起。
                available.await();
            else {
                // 有元素,获取延迟时间。
                long delay = first.getDelay(NANOSECONDS);
                // 判断延迟时间是不是已经到了
                if (delay <= 0)
                    // 基于优先级队列的poll方法返回
                    return q.poll();
                first = null;
                // 如果有消费者在等,就正常await挂起
                if (leader != null)
                    available.await();
                // 如果没有消费者在等的堆顶数据,我来等
                else {
                    // 获取当前线程
                    Thread thisThread = Thread.currentThread();
                    // 设置为leader,代表等待堆顶的数据
                    leader = thisThread;
                    try {
                        // 等待指定(堆顶元素的延迟时间)时长,
                        available.awaitNanos(delay);
                    } finally {
                        if (leader == thisThread)
                            // leader赋值null
                            leader = null;
                    }
                }
            }
        }
    } finally {
        // 避免消费者无线等,来一个唤醒消费者的方法,一般是其他消费者拿到元素走了之后,并且延迟队列还有元素,就执行if内部唤醒方法
        if (leader == null && q.peek() != null)
            available.signal();
        // 释放锁
        lock.unlock();
    }
}
2
3
4
5
6
7
8
9
10
11
12
13
14
15
16
17
18
19
20
21
22
23
24
25
26
27
28
29
30
31
32
33
34
35
36
37
38
39
40
41
42
43
44
45
46
47
# 六、SynchronousQueue
# 6.1 SynchronousQueue介绍
SynchronousQueue这个阻塞队列和其他的阻塞队列有很大的区别
在咱们的概念中,队列肯定是要存储数据的,但是SynchronousQueue不会存储数据的
SynchronousQueue队列中,他不存储数据,存储生产者或者是消费者
当存储一个生产者到SynchronousQueue队列中之后,生产者会阻塞(看你调用的方法)
生产者最终会有几种结果:
- 如果在阻塞期间有消费者来匹配,生产者就会将绑定的消息交给消费者
- 生产者得等阻塞结果,或者不允许阻塞,那么就直接失败
- 生产者在阻塞期间,如果线程中断,直接告辞。
同理,消费者和生产者的效果是一样。
生产者和消费者的数据是直接传递的,不会经过SynchronousQueue。
SynchronousQueue是不会存储数据的。
经过阻塞队列的学习:
生产者:
- offer():生产者在放到SynchronousQueue的同时,如果有消费者在等待消息,直接配对。如果没有消费者在等待消息,这里直接返回,告辞。
- offer(time,unit):生产者在放到SynchronousQueue的同时,如果有消费者在等待消息,直接配对。如果没有消费者在等待消息,阻塞time时间,如果还没有,告辞。
- put():生产者在放到SynchronousQueue的同时,如果有消费者在等待消息,直接配对。如果没有,死等。
消费者:poll(),poll(time,unit),take()。道理和上面的生产者一致。
测试效果:
public static void main(String[] args) throws InterruptedException {
    // 因为当前队列不存在数据,没有长度的概念。
    SynchronousQueue queue = new SynchronousQueue();

    String msg = "消息!";
    /*new Thread(() -> {
        // b = false:代表没有消费者来拿
        boolean b = false;
        try {
            b = queue.offer(msg,1, TimeUnit.SECONDS);
        } catch (InterruptedException e) {
            e.printStackTrace();
        }
        System.out.println(b);
    }).start();

    Thread.sleep(100);

    new Thread(() -> {
        System.out.println(queue.poll());
    }).start();*/
    new Thread(() -> {
        try {
            System.out.println(queue.poll(1, TimeUnit.SECONDS));
        } catch (InterruptedException e) {
            e.printStackTrace();
        }
    }).start();

    Thread.sleep(100);

    new Thread(() -> {
        queue.offer(msg);
    }).start();
}
2
3
4
5
6
7
8
9
10
11
12
13
14
15
16
17
18
19
20
21
22
23
24
25
26
27
28
29
30
31
32
33
34
35
# 6.2 SynchronousQueue核心属性
进到SynchronousQueue类的内部后,发现了一个内部类,Transferer,内部提供了一个transfer的方法
abstract static class Transferer<E> {
    abstract E transfer(E e, boolean timed, long nanos);
}
2
3
当前这个类中提供的transfer方法,就是生产者和消费者在调用读写数据时要用到的核心方法。
生产者在调用上述的transfer方法时,第一个参数e会正常传递数据
消费者在调用上述的transfer方法时,第一个参数e会传递null
SynchronousQueue针对抽象类Transferer做了几种实现。
一共看到了两种实现方式:
- TransferStack
- TransferQueue
这两种类继承了Transferer抽象类,在构建SynchronousQueue时,会指定使用哪种子类
// 到底采用哪种实现,需要把对应的对象存放到这个属性中
private transient volatile Transferer<E> transferer;
// 采用无参时,会调用下述方法,再次调用有参构造传入false
public SynchronousQueue() {
    this(false);
}
// 调用的是当前的有参构造,fair代表公平还是不公平
public SynchronousQueue(boolean fair) {
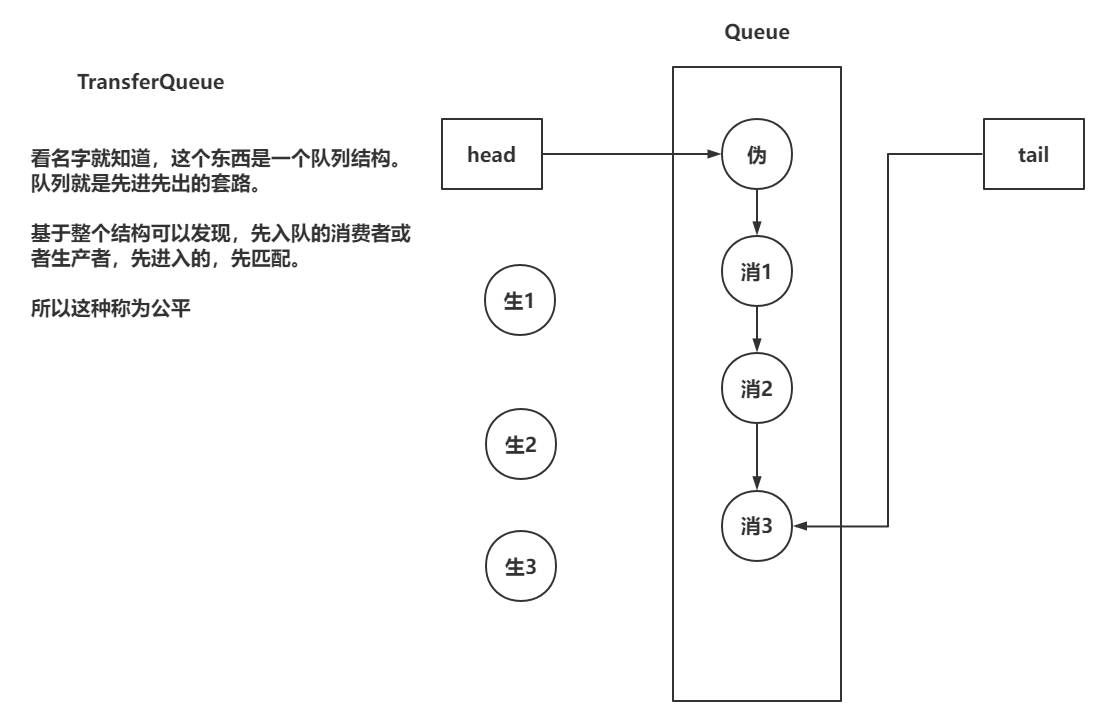
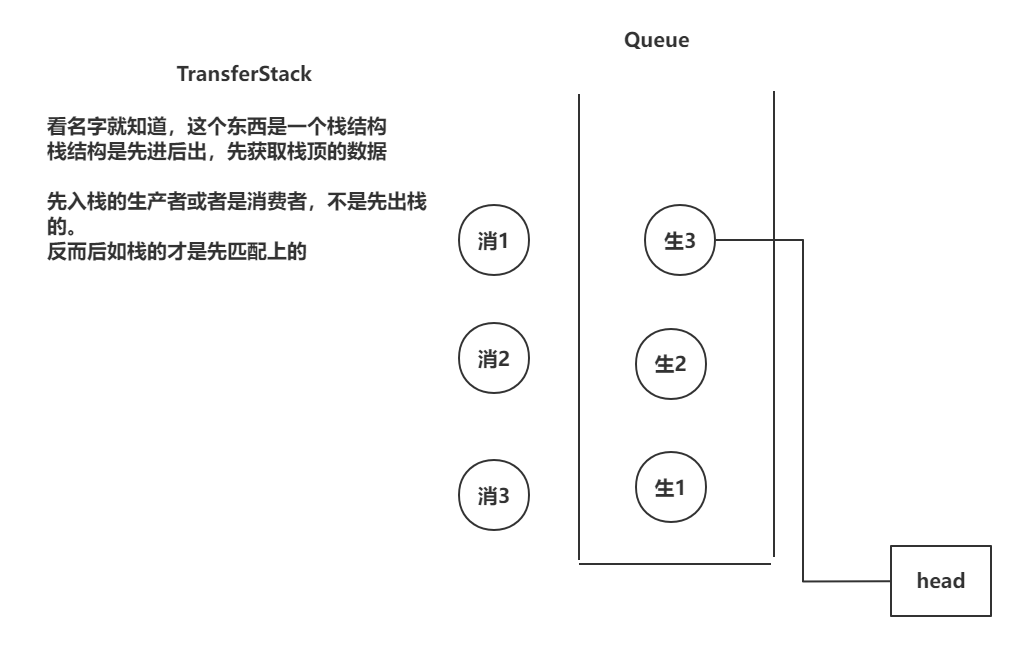
    // 如果是公平,采用Queue,如果是不公平,采用Stack
    transferer = fair ? new TransferQueue<E>() : new TransferStack<E>();
}
2
3
4
5
6
7
8
9
10
11
TransferQueue的特点
代码查看效果
public static void main(String[] args) throws InterruptedException {
    // 因为当前队列不存在数据,没有长度的概念。
    SynchronousQueue queue = new SynchronousQueue(true);
    SynchronousQueue queue = new SynchronousQueue(false);

    new Thread(() -> {
        try {
            queue.put("生1");
        } catch (InterruptedException e) {
            e.printStackTrace();
        }
    }).start();
    new Thread(() -> {
        try {
            queue.put("生2");
        } catch (InterruptedException e) {
            e.printStackTrace();
        }
    }).start();
    new Thread(() -> {
        try {
            queue.put("生3");
        } catch (InterruptedException e) {
            e.printStackTrace();
        }
    }).start();

    Thread.sleep(100);
    new Thread(() -> {
        System.out.println("消1:" + queue.poll());
    }).start();
    Thread.sleep(100);
    new Thread(() -> {
        System.out.println("消2:" + queue.poll());
    }).start();
    Thread.sleep(100);
    new Thread(() -> {
        System.out.println("消3:" + queue.poll());
    }).start();
}
2
3
4
5
6
7
8
9
10
11
12
13
14
15
16
17
18
19
20
21
22
23
24
25
26
27
28
29
30
31
32
33
34
35
36
37
38
39
40
# 6.3 SynchronousQueue的TransferQueue源码
为了查看清除SynchronousQueue的TransferQueue源码,需要从两点开始查看源码信息
# 6.3.1 QNode源码信息
static final class QNode {
    // 当前节点可以获取到next节点
    volatile QNode next;
    // item在不同情况下效果不同
    // 生产者:有数据
    // 消费者:为null
    volatile Object item;
    // 当前线程
    volatile Thread waiter;
    // 当前属性是永磊区分消费者和生产者的属性
    final boolean isData;
    // 最终生产者需要将item交给消费者
    // 最终消费者需要获取生产者的item

    // 省略了大量提供的CAS操作
    ....
}
2
3
4
5
6
7
8
9
10
11
12
13
14
15
16
17
# 6.3.2 transfer方法实现
// 当前方法是TransferQueue的核心内容
// e:传递的数据
// timed:false,代表无限阻塞,true,代表阻塞nacos时间
E transfer(E e, boolean timed, long nanos) {
    // 当前QNode是要封装当前生产者或者消费者的信息
    QNode s = null;
    // isData == true:代表是生产者
    // isData == false:代表是消费者
    boolean isData = (e != null);
    // 死循环
    for (;;) {
        // 获取尾节点和头结点
        QNode t = tail;
        QNode h = head;
        // 为了避免TransferQueue还没有初始化,这边做一个健壮性判断
        if (t == null || h == null)
            continue;

        // 如果满足h == t 条件,说明当前队列没有生产者或者消费者,为空
        // 如果有节点,同时当前节点和队列节点属于同一种角色。
        // if中的逻辑是进到队列
        if (h == t || t.isData == isData) {
            // ===================在判断并发问题==========================
            // 拿到尾节点的next
            QNode tn = t.next;
            // 如果t不为尾节点,进来说明有其他线程并发修改了tail
            if (t != tail)
                // 重新走for循环
                continue;
            // tn如果为不null,说明前面有线程并发,添加了一个节点
            if (tn != null) {
                // 直接帮助那个并发线程修改tail的指向
                advanceTail(t, tn);
                // 重新走for循环
                continue;
            }
            // 获取当前线程是否可以阻塞
            // 如果timed为true,并且阻塞的时间小于等于0
            // 不需要匹配,直接告辞!!!
            if (timed && nanos <= 0)
                return null;
            // 如果可以阻塞,将当前需要插入到队列的QNode构建出来
            if (s == null)
                s = new QNode(e, isData);
            // 基于CAS操作,将tail节点的next设置为当前线程
            if (!t.casNext(null, s))
                // 如果进到if,说明修改失败,重新执行for循环修改
                continue;
            // CAS操作成功,直接替换tail的指向
            advanceTail(t, s);
            // 如果进到队列中了,挂起线程,要么等生产者,要么等消费者。
            // x是返回替换后的数据
            Object x = awaitFulfill(s, e, timed, nanos);
            // 如果元素和节点相等,说明节点取消了
            if (x == s) {
                // 清空当前节点,将上一个节点的next指向当前节点的next,直接告辞
                clean(t, s);
                return null;
            }
            // 判断当前节点是否还在队列中
            if (!s.isOffList()) {
                // 将当前节点设置为head
                advanceHead(t, s);
                // 如果 x != null, 如果拿到了数据,说明我是消费者
                if (x != null)
                    // 将当前节点的item设置为自己
                    s.item = s;
                // 线程置位null
                s.waiter = null;
            }
            // 返回数据
            return (x != null) ? (E)x : e;
        }
        // 匹配队列中的橘色
        else {
            // 拿到head的next,作为要匹配的节点
            QNode m = h.next;
            // 做并发判断,如果头节点,尾节点,或者head.next发生了变化,这边要重新走for循环
            if (t != tail || m == null || h != head)
                continue;
            // 没并发问题,可以拿数据
            // 拿到m节点的item作为x。
            Object x = m.item;
            // 如果isData == (x != null)满足,说明当前出现了并发问题,避免并发消费出现坑
            if (isData == (x != null) ||
                // 如果排队的节点取消,就会讲当前QNode中的item指向QNode
                x == m ||
                // 如果前面两个都没满足,可以交换数据了。
                // 如果交换失败,说明有并发问题,
                !m.casItem(x, e)) {
                // 重新设置head节点,并且再走一次循环
                advanceHead(h, m);
                continue;
            }
            // 替换head
            advanceHead(h, m);
            // 唤醒head.next中的线程
            LockSupport.unpark(m.waiter);
            // 这边匹配好了,数据也交换了,直接返回
            // 如果 x != null,说明队列中是生产者,当前是消费者,这边直接返回x具体数据
            // 反之,队列中是消费者,当前是生产者,直接返回自己的数据
            return (x != null) ? (E)x : e;
        }
    }
}
2
3
4
5
6
7
8
9
10
11
12
13
14
15
16
17
18
19
20
21
22
23
24
25
26
27
28
29
30
31
32
33
34
35
36
37
38
39
40
41
42
43
44
45
46
47
48
49
50
51
52
53
54
55
56
57
58
59
60
61
62
63
64
65
66
67
68
69
70
71
72
73
74
75
76
77
78
79
80
81
82
83
84
85
86
87
88
89
90
91
92
93
94
95
96
97
98
99
100
101
102
103
104
105
# 6.3.3 tansfer方法流程图
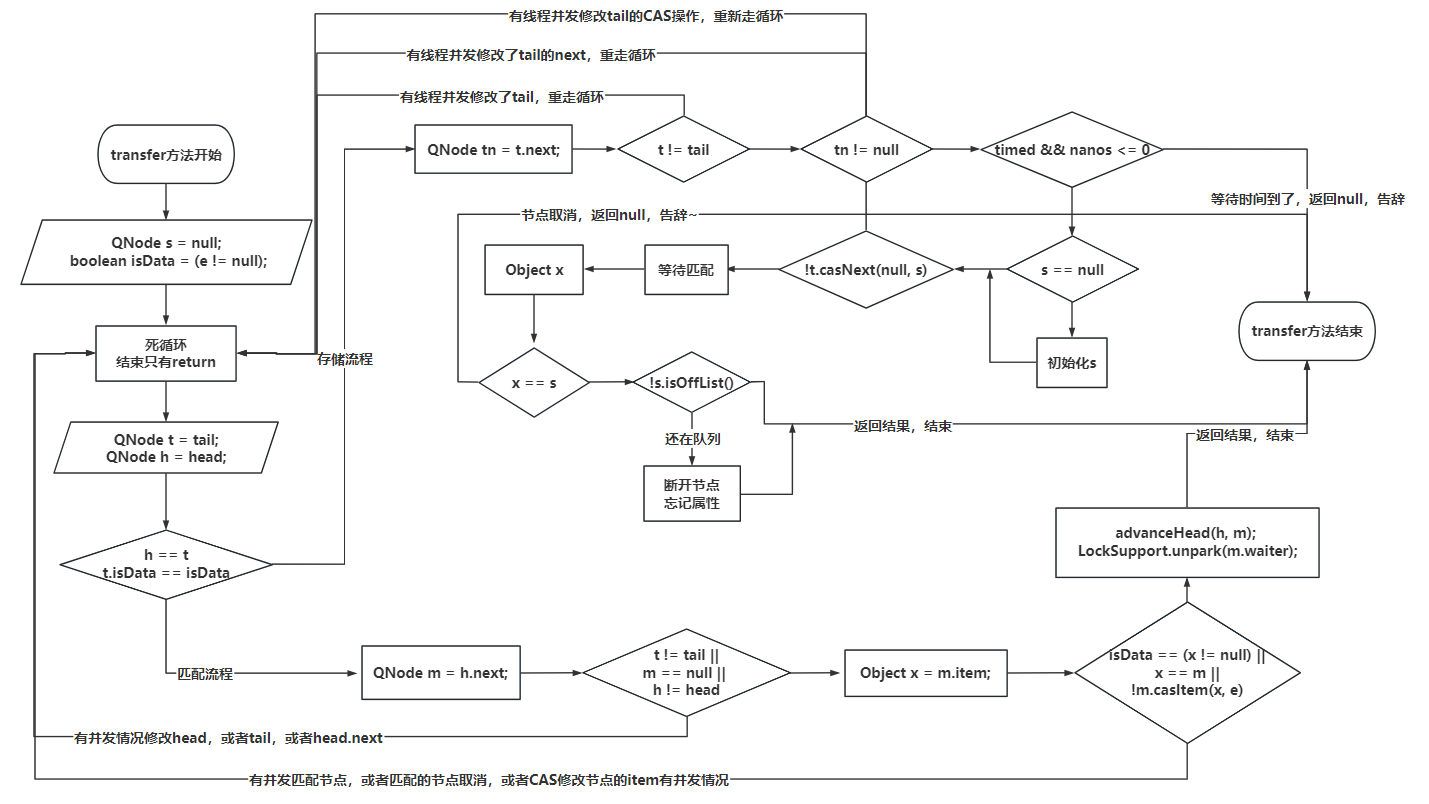
以上便是本文的全部内容,本人才疏学浅,文章有什么错误的地方,欢迎大佬们批评指正!我是scholar,一个在互联网行业的小白,立志成为更好的自己。
如果你想了解更多关于scholar (opens new window) (opens new window),可以关注公众号-书生带你学编程,后面文章会首先同步至公众号。

