 第五章 深入ReentrantReadWriteLock
# 一、为什么要出现读写锁
synchronized和ReentrantLock都是互斥锁。
如果说有一个操作是读多写少的,还要保证线程安全的话。如果采用上述的两种互斥锁,效率方面很定是很低的。
在这种情况下,咱们就可以使用ReentrantReadWriteLock读写锁去实现。
读读之间是不互斥的,可以读和读操作并发执行。
但是如果涉及到了写操作,那么还得是互斥的操作。
static ReentrantReadWriteLock lock = new ReentrantReadWriteLock();

static ReentrantReadWriteLock.WriteLock writeLock = lock.writeLock();

static ReentrantReadWriteLock.ReadLock readLock = lock.readLock();

public static void main(String[] args) throws InterruptedException {
    new Thread(() -> {
        readLock.lock();
        try {
            System.out.println("子线程!");
            try {
                Thread.sleep(500000);
            } catch (InterruptedException e) {
                e.printStackTrace();
            }
        } finally {
            readLock.unlock();
        }
    }).start();

    Thread.sleep(1000);
    writeLock.lock();
    try {
        System.out.println("主线程!");
    } finally {
        writeLock.unlock();
    }
}
2
3
4
5
6
7
8
9
10
11
12
13
14
15
16
17
18
19
20
21
22
23
24
25
26
27
28
29
# 二、读写锁的实现原理
ReentrantReadWriteLock还是基于AQS实现的,还是对state进行操作,拿到锁资源就去干活,如果没有拿到,依然去AQS队列中排队。
读锁操作:基于state的高16位进行操作。
写锁操作:基于state的低16为进行操作。
ReentrantReadWriteLock依然是可重入锁。
写锁重入:读写锁中的写锁的重入方式,基本和ReentrantLock一致,没有什么区别,依然是对state进行+1操作即可,只要确认持有锁资源的线程,是当前写锁线程即可。只不过之前ReentrantLock的重入次数是state的正数取值范围,但是读写锁中写锁范围就变小了。
读锁重入:因为读锁是共享锁。读锁在获取锁资源操作时,是要对state的高16位进行 + 1操作。因为读锁是共享锁,所以同一时间会有多个读线程持有读锁资源。这样一来,多个读操作在持有读锁时,无法确认每个线程读锁重入的次数。为了去记录读锁重入的次数,每个读操作的线程,都会有一个ThreadLocal记录锁重入的次数。
写锁的饥饿问题:读锁是共享锁,当有线程持有读锁资源时,再来一个线程想要获取读锁,直接对state修改即可。在读锁资源先被占用后,来了一个写锁资源,此时,大量的需要获取读锁的线程来请求锁资源,如果可以绕过写锁,直接拿资源,会造成写锁长时间无法获取到写锁资源。
读锁在拿到锁资源后,如果再有读线程需要获取读锁资源,需要去AQS队列排队。如果队列的前面需要写锁资源的线程,那么后续读线程是无法拿到锁资源的。持有读锁的线程,只会让写锁线程之前的读线程拿到锁资源
# 三、写锁分析
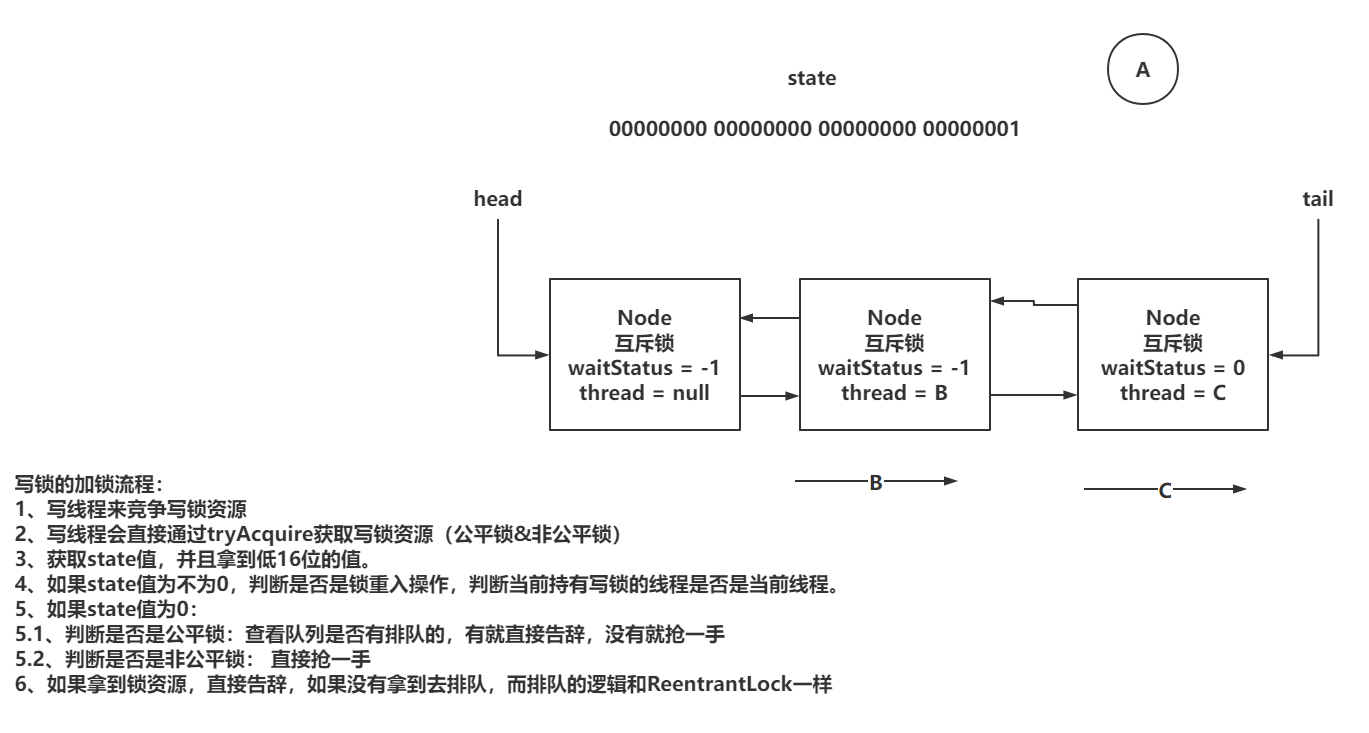
# 3.1 写锁加锁流程概述

# 3.2 写锁加锁源码分析
写锁加锁流程
// 写锁加锁的入口
public void lock() {
    sync.acquire(1);
}

// 阿巴阿巴!!
public final void acquire(int arg) {
    if (!tryAcquire(arg) &&
        acquireQueued(addWaiter(Node.EXCLUSIVE), arg))
        selfInterrupt();
}

// 读写锁的写锁实现tryAcquire
protected final boolean tryAcquire(int acquires) {
    // 拿到当前线程
    Thread current = Thread.currentThread();
    // 拿到state的值
    int c = getState();
    // 得到state低16位的值
    int w = exclusiveCount(c);
    // 判断是否有线程持有着锁资源
    if (c != 0) {
        // 当前没有线程持有写锁,读写互斥,告辞。
        // 有线程持有写锁,持有写锁的线程不是当前线程,不是锁重入,告辞。
        if (w == 0 || current != getExclusiveOwnerThread())
            return false;
        // 当前线程持有写锁。 锁重入。
        if (w + exclusiveCount(acquires) > MAX_COUNT)
            throw new Error("Maximum lock count exceeded");
        // 没有超过锁重入的次数,正常 + 1
        setState(c + acquires);
        return true;
    }
    // 尝试获取锁资源
    if (writerShouldBlock() ||
        // CAS拿锁
        !compareAndSetState(c, c + acquires))
        return false;
    // 拿锁成功,设置占有互斥锁的线程
    setExclusiveOwnerThread(current);
    // 返回true
    return true;
}

// ================================================================
// 这个方法是将state的低16位的值拿到
int w = exclusiveCount(c);
state & ((1 << 16) - 1)
00000000 00000000 00000000 00000001    ==   1
00000000 00000001 00000000 00000000    ==   1 << 16
00000000 00000000 11111111 11111111    ==   (1 << 16) - 1
&运算,一个为0,必然为0,都为1,才为1
// ================================================================
// writerShouldBlock方法查看公平锁和非公平锁的效果
// 非公平锁直接返回false执行CAS尝试获取锁资源
// 公平锁需要查看是否有排队的,如果有排队的,我是否是head的next
2
3
4
5
6
7
8
9
10
11
12
13
14
15
16
17
18
19
20
21
22
23
24
25
26
27
28
29
30
31
32
33
34
35
36
37
38
39
40
41
42
43
44
45
46
47
48
49
50
51
52
53
54
55
56
# 3.3 写锁释放锁流程概述&释放锁源码
释放的流程和ReentrantLock一致,只是在判断释放是否干净时,判断低16位的值
// 写锁释放锁的tryRelease方法
protected final boolean tryRelease(int releases) {
    // 判断当前持有写锁的线程是否是当前线程
    if (!isHeldExclusively())
        throw new IllegalMonitorStateException();
    // 获取state - 1
    int nextc = getState() - releases;
    // 判断低16位结果是否为0,如果为0,free设置为true
    boolean free = exclusiveCount(nextc) == 0;
    if (free)
        // 将持有锁的线程设置为null
        setExclusiveOwnerThread(null);
    // 设置给state
    setState(nextc);
    // 释放干净,返回true。  写锁有冲入,这里需要返回false,不去释放排队的Node
    return free;
}
2
3
4
5
6
7
8
9
10
11
12
13
14
15
16
17
# 四、读锁分析
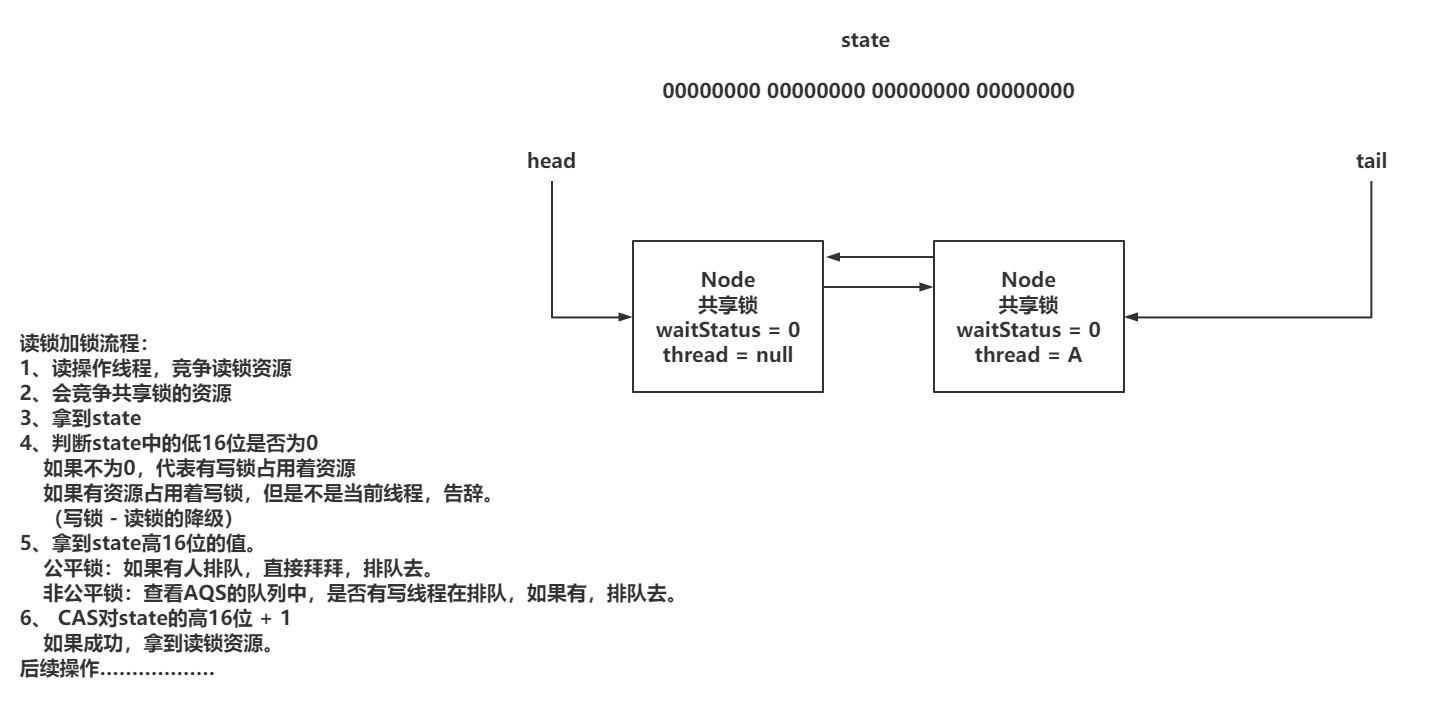
# 4.1 读锁加锁流程概述
1、分析读锁加速的基本流程
2、分析读锁的可重入锁实现以及优化
3、解决ThreadLocal内存泄漏问题
4、读锁获取锁自后,如果唤醒AQS中排队的读线程
# 4.1.1 基础读锁流程

针对上述简单逻辑的源码分析
// 读锁加锁的方法入口
public final void acquireShared(int arg) {
    // 竞争锁资源滴干活
    if (tryAcquireShared(arg) < 0)
        // 没拿到锁资源,去排队
        doAcquireShared(arg);
}

// 读锁竞争锁资源的操作
protected final int tryAcquireShared(int unused) {
    // 拿到当前线程
    Thread current = Thread.currentThread();
    // 拿到state
    int c = getState();
    // 拿到state的低16位,判断 != 0,有写锁占用着锁资源
    // 并且,当前占用锁资源的线程不是当前线程
    if (exclusiveCount(c) != 0 && getExclusiveOwnerThread() != current)
        // 写锁被其他线程占用,无法获取读锁,直接返回 -1,去排队
        return -1;
    // 没有线程持有写锁、当前线程持有写锁
    // 获取读锁的信息,state的高16位。
    int r = sharedCount(c);
    // 公平锁:就查看队列是由有排队的,有排队的,直接告辞,进不去if,后面也不用判断(没人排队继续走)
    // 非公平锁:没有排队的,直接抢。 有排队的,但是读锁其实不需要排队,如果出现这个情况,大部分是写锁资源刚刚释放,
    // 后续Node还没有来记得拿到读锁资源,当前竞争的读线程,可以直接获取
    if (!readerShouldBlock() &&
        // 判断持有读锁的临界值是否达到
        r < MAX_COUNT &&
        // CAS修改state,对高16位进行 + 1
        compareAndSetState(c, c + SHARED_UNIT)) {
        // 省略部分代码!!!!
        return 1;
    }
    return fullTryAcquireShared(current);
}
// 非公平锁的判断
final boolean apparentlyFirstQueuedIsExclusive() {
    Node h, s;
    return (h = head) != null &&    // head为null,可以直接抢占锁资源
        (s = h.next)  != null &&    // head的next为null,可以直接抢占锁资源
        !s.isShared()         &&    // 如果排在head后面的Node,是共享锁,可以直接抢占锁资源。
        s.thread != null;           // 后面排队的thread为null,可以直接抢占锁资源
}
2
3
4
5
6
7
8
9
10
11
12
13
14
15
16
17
18
19
20
21
22
23
24
25
26
27
28
29
30
31
32
33
34
35
36
37
38
39
40
41
42
43
# 4.1.2 读锁重入流程
=============================重入操作================
前面阐述过,读锁为了记录锁重入的次数,需要让每个读线程用ThreadLocal存储重入次数
ReentrantReadWriteLock对读锁重入做了一些优化操作
============================记录重入次数的核心================
ReentrantReadWriteLock在内部对ThreadLocal做了封装,基于HoldCount的对象存储重入次数,在内部有个count属性记录,而且每个线程都是自己的ThreadLocalHoldCounter,所以可以直接对内部的count进行++操作。
=============================第一个获取读锁资源的重入次数记录方式================
第一个拿到读锁资源的线程,不需要通过ThreadLocal存储,内部提供了两个属性来记录第一个拿到读锁资源线程的信息
内部提供了firstReader记录第一个拿到读锁资源的线程,firstReaderHoldCount记录firstReader的锁重入次数
==============================最后一个获取读锁资源的重入次数记录方式================
最后一个拿到读锁资源的线程,也会缓存他的重入次数,这样++起来更方便
基于cachedHoldCounter缓存最后一个拿到锁资源现成的重入次数
==============================最后一个获取读锁资源的重入次数记录方式================
重入次数的流程执行方式:
1、判断当前线程是否是第一个拿到读锁资源的:如果是,直接将firstReader以及firstReaderHoldCount设置为当前线程的信息
2、判断当前线程是否是firstReader:如果是,直接对firstReaderHoldCount++即可。
3、跟firstReader没关系了,先获取cachedHoldCounter,判断是否是当前线程。
3.1、如果不是,获取当前线程的重入次数,将cachedHoldCounter设置为当前线程。
3.2、如果是,判断当前重入次数是否为0,重新设置当前线程的锁从入信息到readHolds(ThreadLocal)中,算是初始化操作,重入次数是0
3.3、前面两者最后都做count++
上述逻辑源码分析
protected final int tryAcquireShared(int unused) {
    Thread current = Thread.currentThread();
    int c = getState();
    if (exclusiveCount(c) != 0 &&
        getExclusiveOwnerThread() != current)
        return -1;
    int r = sharedCount(c);
    if (!readerShouldBlock() &&
        r < MAX_COUNT &&
        compareAndSetState(c, c + SHARED_UNIT)) {
        // ===============================================================
        // 判断r == 0,当前是第一个拿到读锁资源的线程
        if (r == 0) {
            // 将firstReader设置为当前线程
            firstReader = current;
            // 将count设置为1
            firstReaderHoldCount = 1;
        }
        // 判断当前线程是否是第一个获取读锁资源的线程
        else if (firstReader == current) {
            // 直接++。
            firstReaderHoldCount++;
        }
        // 到这,就说明不是第一个获取读锁资源的线程
        else {
            // 那获取最后一个拿到读锁资源的线程
            HoldCounter rh = cachedHoldCounter;
            // 判断当前线程是否是最后一个拿到读锁资源的线程
            if (rh == null || rh.tid != getThreadId(current))
                // 如果不是,设置当前线程为cachedHoldCounter
                cachedHoldCounter = rh = readHolds.get();
            // 当前线程是之前的cacheHoldCounter
            else if (rh.count == 0)
                // 将当前的重入信息设置到ThreadLocal中
                readHolds.set(rh);
            // 重入的++
            rh.count++;
        }
        // ===============================================================
        return 1;
    }
    return fullTryAcquireShared(current);
}
2
3
4
5
6
7
8
9
10
11
12
13
14
15
16
17
18
19
20
21
22
23
24
25
26
27
28
29
30
31
32
33
34
35
36
37
38
39
40
41
42
43
# 4.1.3 读锁加锁的后续逻辑fullTryAcquireShared
// tryAcquireShard方法中,如果没有拿到锁资源,走这个方法,尝试再次获取,逻辑跟上面基本一致。
final int fullTryAcquireShared(Thread current) {
    // 声明当前线程的锁重入次数
    HoldCounter rh = null;
    // 死循环
    for (;;) {
        // 再次拿到state
        int c = getState();
        // 当前如果有写锁在占用锁资源,并且不是当前线程,返回-1,走排队策略
        if (exclusiveCount(c) != 0) {
            if (getExclusiveOwnerThread() != current)
                return -1;

        }
        // 查看当前是否可以尝试竞争锁资源(公平锁和非公平锁的逻辑)
        else if (readerShouldBlock()) {
            // 无论公平还是非公平,只要进来,就代表要放到AQS队列中了,先做一波准备
            // 在处理ThreadLocal的内存泄漏问题
            if (firstReader == current) {
                // 如果当前当前线程是之前的firstReader,什么都不用做
            } else {
                // 第一次进来是null。
                if (rh == null) {
                    // 拿到最后一个获取读锁的线程
                    rh = cachedHoldCounter;
                    // 当前线程并不是cachedHoldCounter,没到拿到
                    if (rh == null || rh.tid != getThreadId(current)) {
                        // 从自己的ThreadLocal中拿到重入计数器
                        rh = readHolds.get();
                        // 如果计数器为0,说明之前没拿到过读锁资源
                        if (rh.count == 0)
                            // remove,避免内存泄漏
                            readHolds.remove();
                    }
                }
                // 前面处理完之后,直接返回-1
                if (rh.count == 0)
                    return -1;
            }
        }
        // 判断重入次数,是否超出阈值
        if (sharedCount(c) == MAX_COUNT)
            throw new Error("Maximum lock count exceeded");
        // CAS尝试获取锁资源
        if (compareAndSetState(c, c + SHARED_UNIT)) {
            if (sharedCount(c) == 0) {
                firstReader = current;
                firstReaderHoldCount = 1;
            } else if (firstReader == current) {
                firstReaderHoldCount++;
            } else {
                if (rh == null)
                    rh = cachedHoldCounter;
                if (rh == null || rh.tid != getThreadId(current))
                    rh = readHolds.get();
                else if (rh.count == 0)
                    readHolds.set(rh);
                rh.count++;
                cachedHoldCounter = rh; // cache for release
            }
            return 1;
        }
    }
}
2
3
4
5
6
7
8
9
10
11
12
13
14
15
16
17
18
19
20
21
22
23
24
25
26
27
28
29
30
31
32
33
34
35
36
37
38
39
40
41
42
43
44
45
46
47
48
49
50
51
52
53
54
55
56
57
58
59
60
61
62
63
64
# 4.1.4 读线程在AQS队列获取锁资源的后续操作
1、正常如果都是读线程来获取读锁资源,不需要使用到AQS队列的,直接CAS操作即可
2、如果写线程持有着写锁,这是读线程就需要进入到AQS队列排队,可能会有多个读线程在AQS中。
当写锁释放资源后,会唤醒head后面的读线程,当head后面的读线程拿到锁资源后,还需要查看next节点是否也是读线程在阻塞,如果是,直接唤醒
源码分析
// 读锁需要排队的操作
private void doAcquireShared(int arg) {
    // 声明Node,类型是共享锁,并且扔到AQS中排队
    final Node node = addWaiter(Node.SHARED);
    boolean failed = true;
    try {
        boolean interrupted = false;
        for (;;) {
            // 拿到上一个节点
            final Node p = node.predecessor();
            // 如果prev节点是head,直接可以执行tryAcquireShared
            if (p == head) {
                int r = tryAcquireShared(arg);
                if (r >= 0) {
                    // 拿到读锁资源后,需要做的后续处理
                    setHeadAndPropagate(node, r);
                    p.next = null; // help GC
                    if (interrupted)
                        selfInterrupt();
                    failed = false;
                    return;
                }
            }
            // 找到prev有效节点,将状态设置为-1,挂起当前线程
            if (shouldParkAfterFailedAcquire(p, node) &&
                parkAndCheckInterrupt())
                interrupted = true;
        }
    } finally {
        if (failed)
            cancelAcquire(node);
    }
}

private void setHeadAndPropagate(Node node, int propagate) {
    // 拿到head节点
    Node h = head;
    // 将当前节点设置为head节点
    setHead(node);
    // 第一个判断更多的是在信号量有处理JDK1.5 BUG的操作。
    if (propagate > 0 || h == null || h.waitStatus < 0 || (h = head) == null || h.waitStatus < 0) {
        // 拿到当前Node的next节点
        Node s = node.next;
        // 如果next节点是共享锁,直接唤醒next节点
        if (s == null || s.isShared())
            doReleaseShared();
    }
}
2
3
4
5
6
7
8
9
10
11
12
13
14
15
16
17
18
19
20
21
22
23
24
25
26
27
28
29
30
31
32
33
34
35
36
37
38
39
40
41
42
43
44
45
46
47
48
# 4.2 读锁的释放锁流程
1、处理重入以及state的值
2、唤醒后续排队的Node
源码分析
// 读锁释放锁流程
public final boolean releaseShared(int arg) {
    // tryReleaseShared:处理state的值,以及可重入的内容
    if (tryReleaseShared(arg)) {
        // AQS队列的事!
        doReleaseShared();
        return true;
    }
    return false;
}

// 1、 处理重入问题  2、 处理state
protected final boolean tryReleaseShared(int unused) {
    // 拿到当前线程
    Thread current = Thread.currentThread();
    // 如果是firstReader,直接干活,不需要ThreadLocal
    if (firstReader == current) {
        // assert firstReaderHoldCount > 0;
        if (firstReaderHoldCount == 1)
            firstReader = null;
        else
            firstReaderHoldCount--;
    }
    // 不是firstReader,从cachedHoldCounter以及ThreadLocal处理
    else {
        // 如果是cachedHoldCounter,正常--
        HoldCounter rh = cachedHoldCounter;
        // 如果不是cachedHoldCounter,从自己的ThreadLocal中拿
        if (rh == null || rh.tid != getThreadId(current))
            rh = readHolds.get();
        int count = rh.count;
        // 如果为1或者更小,当前线程就释放干净了,直接remove,避免value内存泄漏
        if (count <= 1) {
            readHolds.remove();
            // 如果已经是0,没必要再unlock,扔个异常
            if (count <= 0)
                throw unmatchedUnlockException();
        }
        // -- 走你。
        --rh.count;
    }
    for (;;) {
        // 拿到state,高16位,-1,成功后,返回state是否为0
        int c = getState();
        int nextc = c - SHARED_UNIT;
        if (compareAndSetState(c, nextc))
            return nextc == 0;
    }
}

// 唤醒AQS中排队的线程
private void doReleaseShared() {
    // 死循环
    for (;;) {
        // 拿到头
        Node h = head;
        // 说明有排队的
        if (h != null && h != tail) {
            // 拿到head的状态
            int ws = h.waitStatus;
            // 判断是否为 -1
            if (ws == Node.SIGNAL) {
                // 到这,说明后面有挂起的线程,先基于CAS将head的状态从-1,改为0
                if (!compareAndSetWaitStatus(h, Node.SIGNAL, 0))
                    continue;
                // 唤醒后续节点
                unparkSuccessor(h);
            }
            // 这里不是给读写锁准备的,在信号量里说。。。
            else if (ws == 0 && !compareAndSetWaitStatus(h, 0, Node.PROPAGATE))
                continue;
        }
        // 这里是出口
        if (h == head)
            break;
    }
}
2
3
4
5
6
7
8
9
10
11
12
13
14
15
16
17
18
19
20
21
22
23
24
25
26
27
28
29
30
31
32
33
34
35
36
37
38
39
40
41
42
43
44
45
46
47
48
49
50
51
52
53
54
55
56
57
58
59
60
61
62
63
64
65
66
67
68
69
70
71
72
73
74
75
76
77
# 五、死锁问题
参考文档:(死锁的成因和解决方案)[https://blog.csdn.net/m0_53882348/article/details/129918287]
以上便是本文的全部内容,本人才疏学浅,文章有什么错误的地方,欢迎大佬们批评指正!我是scholar,一个在互联网行业的小白,立志成为更好的自己。
如果你想了解更多关于scholar (opens new window) (opens new window),可以关注公众号-书生带你学编程,后面文章会首先同步至公众号。

