 Nginx - 下载站点及美化
# Nginx - 下载站点及美化
在日常开发或部署中,有时会需要在浏览器中直接查看服务器上的文件目录,比如下载日志文件、查看资源文件等。Nginx 本身内置了一个用于目录浏览的模块 —— ngx_http_autoindex_module (opens new window)。它可以快速地在浏览器中列出服务器指定目录下的文件与子目录。
不过,Nginx 默认的目录浏览界面较为简陋,且容易出现中文文件名乱码等问题。为了解决这些问题,可以使用第三方 FancyIndex 模块进行美化。
# 一、Nginx autoindex 基础功能与配置
# 1. ngx_http_autoindex_module 模块简介
ngx_http_autoindex_module 模块提供了目录浏览的核心功能。当你访问 Nginx 配置中开启 autoindex 功能的某个目录时,Nginx 会生成一个简单的文件列表界面。
该模块包含以下几条常用指令:
| 指令 | 默认值 | 可选值 | 配置作用域 | 示例 |
|---|---|---|---|---|
| autoindex | off | - on:开启目录浏览- off:关闭目录浏览 | http, server, location | autoindex on; 开启目录浏览功能 |
| autoindex_format | html | - html- xml- json- jsonp | http, server, location | autoindex_format html; 以网页形式展示目录(1.7.9+ 支持) |
| autoindex_exact_size | on | - on:以字节数显示文件大小- off:以可读方式显示(KB、MB、GB) | http, server, location | autoindex_exact_size off; 切换为可读方式 |
| autoindex_localtime | off | - on:使用服务器本地时间- off:使用 GMT 时间 | http, server, location | autoindex_localtime on; 使用服务器时间展示 |
注意:
autoindex_format、autoindex_exact_size、autoindex_localtime在使用html格式时生效。
# 2. 基本的目录浏览配置
下面演示一个最简单的目录浏览配置。假设我们要浏览 /home/map/www/ 目录,并通过 http://your-domain/download 访问,Nginx 配置可写成:
location /download {
    root /home/map/www/;            # 指定要浏览的本地目录
    autoindex on;                   # 开启目录浏览
    autoindex_format html;          # 以 html 格式展示目录
    autoindex_exact_size off;       # 文件大小以可读方式显示 (KB、MB、GB)
    autoindex_localtime on;         # 以服务器本地时间显示
}
2
3
4
5
6
7
完成配置后,重启或重新加载 Nginx:
# 假设 Nginx 安装后命令为 nginx
nginx -s reload
2
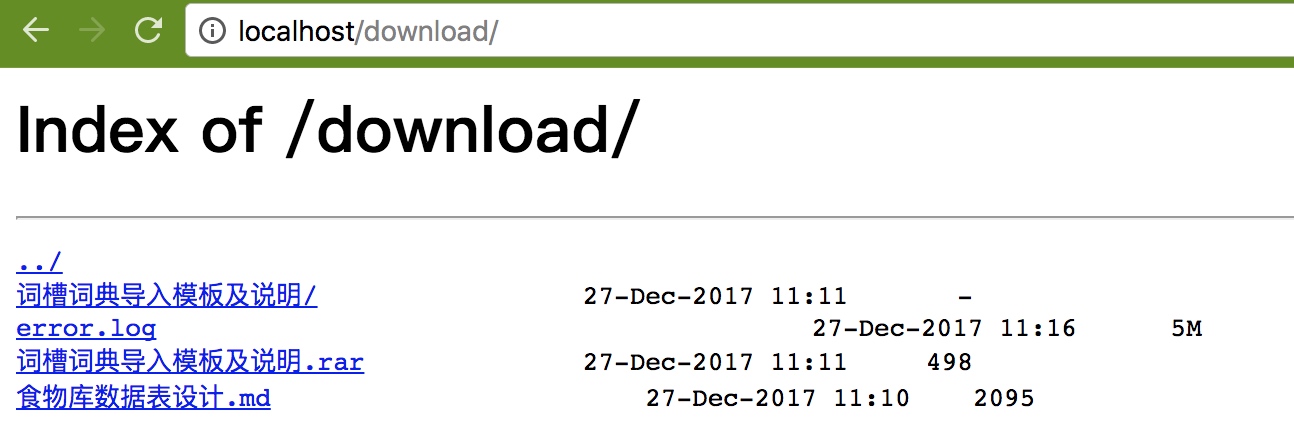
此时,在浏览器访问 http://your-domain/download,可以看到一个类似下图的目录列表:

可以看到,文件大小、修改时间等信息都正常显示。但若目录或文件名中包含中文,可能会出现乱码。
# 二、解决中文文件名乱码
要让目录列表能够正确显示中文文件名,只需在对应的 location 配置中增加一行 charset 指令。例如:
location /download {
    root /home/map/www/;
    autoindex on;
    autoindex_format html;
    autoindex_exact_size off;
    autoindex_localtime on;

    # 展示中文文件名(可同时添加 utf-8 和 gbk,以兼容不同编码的文件名)
    charset utf-8,gbk;
}
2
3
4
5
6
7
8
9
10
然后重新加载 Nginx 配置。这样就能在浏览器中正确显示中文文件名,如下图所示:
# 三、进一步美化:使用 FancyIndex
# 1. FancyIndex 简介
Nginx 默认的目录列表页面比较朴素。如果你想要更漂亮的列表样式,可以借助第三方开源模块 ngx-fancyindex (opens new window)。它提供了更丰富的样式和功能,使得目录浏览页面更像是一个精心设计的文件管理器。
FancyIndex 的项目地址:
- GitHub 主仓库:https://github.com/aperezdc/ngx-fancyindex
但是 FancyIndex 本身只提供了大致的基础样式。如果想要更好看的主题,可以借助社区里的一些 FancyIndex 主题包,例如:
- Naereen/Nginx-Fancyindex-Theme (opens new window)
- TheInsomniac/Nginx-Fancyindex-Theme (opens new window)
如果你喜欢我的下载站点,这里提供我的源码地址:https://download.wym123.cn/download/dark/nginx相关配置 (opens new window),找到 myNginx-Theme.tar.gz 进行下载。
下载后,放到服务器的某个路径下,然后需要重新编译安装 Nginx,也就是说,你要备份好你之前的配置文件、静态页面目录、日志文件目录。
如果你试过 Nginx 的源码安装,那么一定不陌生 ./configure 来编译,如果不知道如何安装,请看 Nginx - 环境准备 (opens new window)。
# 2. 安装 FancyIndex 模块
# 2-1 确认当前 Nginx 已编译的模块
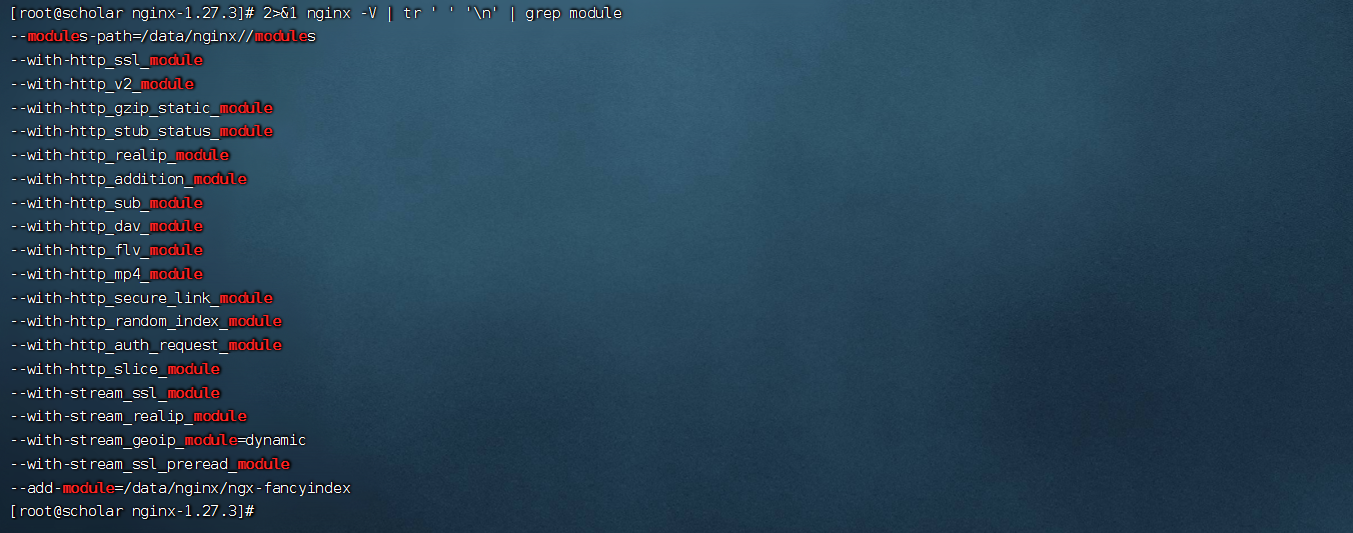
使用以下命令查看 Nginx 模块列表(仅显示包含关键字 module 的行),可以参考我安装FancyIndex 模块时所需要的一些模块列表,
2>&1 nginx -V | tr ' ' '\n' | grep module
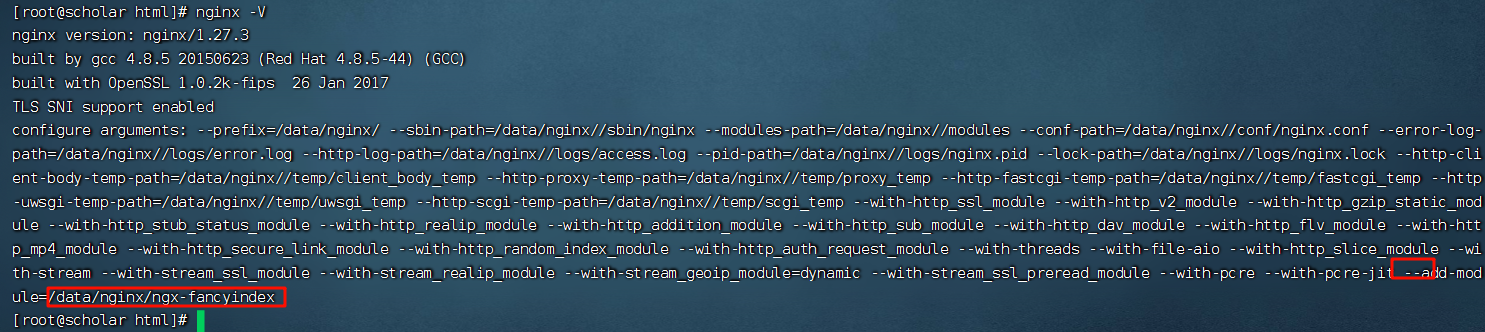
- 若想查看更详细的编译参数,直接执行:
nginx -V
例子输出(这是我的编译参数输出):
configure arguments: --prefix=/data/nginx/ --sbin-path=/data/nginx//sbin/nginx --modules-path=/data/nginx//modules --conf-path=/data/nginx//conf/nginx.conf --error-log-path=/data/nginx//logs/error.log --http-log-path=/data/nginx//logs/access.log --pid-path=/data/nginx//logs/nginx.pid --lock-path=/data/nginx//logs/nginx.lock --http-client-body-temp-path=/data/nginx//temp/client_body_temp --http-proxy-temp-path=/data/nginx//temp/proxy_temp --http-fastcgi-temp-path=/data/nginx//temp/fastcgi_temp --http-uwsgi-temp-path=/data/nginx//temp/uwsgi_temp --http-scgi-temp-path=/data/nginx//temp/scgi_temp --with-http_ssl_module --with-http_v2_module --with-http_gzip_static_module --with-http_stub_status_module --with-http_realip_module --with-http_addition_module --with-http_sub_module --with-http_dav_module --with-http_flv_module --with-http_mp4_module --with-http_secure_link_module --with-http_random_index_module --with-http_auth_request_module --with-threads --with-file-aio --with-http_slice_module --with-stream --with-stream_ssl_module --with-stream_realip_module --with-stream_geoip_module=dynamic --with-stream_ssl_preread_module --with-pcre --with-pcre-jit --add-module=/data/nginx/ngx-fancyindex
# 2-2 动态添加模块(源码编译法)
如果发现上述输出的参数中没有 FancyIndex,那么需要先去GitHub 下载 ngx-fancyindex 源码 (opens new window) ,然后以 源码编译 方式进行安装,安装完成nginx -V检查输出结果中有没有FancyIndex模块;
下载并解压
ngx-fancyindex-0.4.2.tar.gz,将解压后的文件夹放到 Nginx 源码目录(源码默认安装是在/usr/local/nginx)中,这里我是放在/data/nginx文件夹中。进入 Nginx 源码目录,重新配置编译选项,添加
--add-module=/data/nginx/ngx-fancyindex:在源码目录里面编译之前可以执行下列命令安装所需要的模块
sudo yum install -y \
    gcc \
    gcc-c++ \
    make \
    pcre-devel \
    zlib-devel \
    openssl-devel \
    libxml2-devel \
    libxslt-devel \
    gd-devel \
    perl \
    perl-devel \
    perl-ExtUtils-Embed \
    geoip-devel \
    libatomic_ops-devel \
    libaio-devel \
    file-devel
1
2
3
4
5
6
7
8
9
10
11
12
13
14
15
16
17这里的
/data/nginx/是我存放nginx的位置,然后使用./configure命令进行源码编译安装:./configure --prefix=/data/nginx/ \ --sbin-path=/data/nginx//sbin/nginx \ --modules-path=/data/nginx//modules \ --conf-path=/data/nginx//conf/nginx.conf \ --error-log-path=/data/nginx//logs/error.log \ --http-log-path=/data/nginx//logs/access.log \ --pid-path=/data/nginx//logs/nginx.pid \ --lock-path=/data/nginx//logs/nginx.lock \ --http-client-body-temp-path=/data/nginx/temp/client_body_temp \ --http-proxy-temp-path=/data/nginx//temp/proxy_temp \ --http-fastcgi-temp-path=/data/nginx//temp/fastcgi_temp \ --http-uwsgi-temp-path=/data/nginx//temp/uwsgi_temp \ --http-scgi-temp-path=/data/nginx//temp/scgi_temp \ --with-http_ssl_module \ --with-http_v2_module \ --with-http_gzip_static_module \ --with-http_stub_status_module \ --with-http_realip_module \ --with-http_addition_module \ --with-http_sub_module \ --with-http_dav_module \ --with-http_flv_module \ --with-http_mp4_module \ --with-http_secure_link_module \ --with-http_random_index_module \ --with-http_auth_request_module \ --with-threads \ --with-file-aio \ --with-http_slice_module \ --with-stream \ --with-stream_ssl_module \ --with-stream_realip_module \ --with-stream_geoip_module=dynamic \ --with-stream_ssl_preread_module \ --with-pcre \ --with-pcre-jit \ --add-module=/data/nginx/ngx-fancyindex1
2
3
4
5
6
7
8
9
10
11
12
13
14
15
16
17
18
19
20
21
22
23
24
25
26
27
28
29
30
31
32
33
34
35
36
37执行
make,注意不要make install,以避免覆盖已有的 Nginx 安装。编译完成后,会在
objs/目录下生成新的nginx可执行文件(已包含 FancyIndex 模块),可以执行执行2>&1 ./nginx -V | tr ' ' '\n'|grep fan检查是否包含 FancyIndex 模块。
将该
nginx可执行文件替换系统中原有的nginx(默认是/usr/local/nginx/sbin/nginx,我这里是/data/nginx/sbin/nginx),然后重启或重新加载 Nginx,即可生效。
提示:如果使用的是某些现代化的包管理器或容器环境,也可以寻找是否有带
fancyindex的预编译包,或者使用load_module方式加载动态模块(需编译出.so文件)。不同发行版的操作可能略有区别。
# 四、使用 FancyIndex 主题美化
# 1. 下载并使用主题
如果你喜欢我的下载站点,这里提供我的源码地址:https://download.wym123.cn/download/dark/nginx相关配置 (opens new window),找到 myNginx-Theme.tar.gz 进行下载。
进入 Nginx 安装目录下的 html 或者你用于放置静态文件的目录。
cd /data/nginx/html1将下载后的
myNginx-Theme.tar.gz上传到/data/nginx/html并解压tar -zxvf myNginx-Theme.tar.gz1这样在
/data/nginx/html/下就多了一个Nginx-Fancyindex-Theme文件夹,里面包含主题的 CSS、JS、图片以及 fancyindex.conf 等配置文件。
# 2. 配置 Nginx 使用 FancyIndex
在某个 location 中引用该主题的配置。示例如下:
     # 下载网站
	server {
	    listen 443 ssl;
	    server_name download.wym123.cn;

	    ssl_certificate /usr/local/nginx/download.wym123.cn_bundle.pem;
	    ssl_certificate_key /usr/local/nginx/download.wym123.cn.key;
	    ssl_session_timeout 5m;
	    ssl_ciphers ECDHE-RSA-AES128-GCM-SHA256:ECDHE:ECDH:AES:HIGH:!NULL:!aNULL:!MD5:!ADH:!RC4;
	    ssl_protocols TLSv1.2 TLSv1.3;
	    ssl_prefer_server_ciphers on;


	    # 🚀 让 `https://download.wym123.cn` 访问 `/download/light`
	    location = / {
	        rewrite ^ /download/light last;
	    }

	    # 🚀 让 `https://download.wym123.cn/download` 也访问 `/download/light`
	    location = /download {
	        rewrite ^ /download/light last;
	    }

	    # 🔹 Light 主题(默认所有请求走这里)
	    location /download/light {
	        alias  /data/nginx/html/download;
	        include /data/nginx/html/Nginx-Fancyindex-Theme/light.conf;
		   # 以这些后缀的文件点击后为下载,注释掉则 txt 等文件是在网页打开并查看内容
#	        if ($request_filename ~* ^.*?\.(txt|doc|pdf|rar|gz|zip|docx|exe|xlsx|ppt|pptx|conf)$){
#	           add_header Content-Disposition 'attachment;';
#	        }
	        charset utf-8,gbk; # 展示中文文件名
	    }

	    # 🔹 Dark 主题
	    location /download/dark {
	        alias  /data/nginx/html/download;
	        include /data/nginx/html/Nginx-Fancyindex-Theme/dark.conf;
		   # 以这些后缀的文件点击后为下载,注释掉则 txt 等文件是在网页打开并查看内容
#	        if ($request_filename ~* ^.*?\.(txt|doc|pdf|rar|gz|zip|docx|exe|xlsx|ppt|pptx|conf)$){
#	           add_header Content-Disposition 'attachment;';
#	        }
	        charset utf-8,gbk; # 展示中文文件名
	    }

	    # 🔹 Red 主题
	    location /download/red {
	        alias  /data/nginx/html/download;
	        include /data/nginx/html/Nginx-Fancyindex-Theme/red.conf;
		   # 以这些后缀的文件点击后为下载,注释掉则 txt 等文件是在网页打开并查看内容
#	        if ($request_filename ~* ^.*?\.(txt|doc|pdf|rar|gz|zip|docx|exe|xlsx|ppt|pptx|conf)$){
#	           add_header Content-Disposition 'attachment;';
#	        }
	        charset utf-8,gbk; # 展示中文文件名
	    }

	    # 🚀 处理没有 `/` 结尾的情况,比如 `https://download.wym123.cn`
	    location /download {
	        return 301 https://$host/download/;
	    }
	}
2
3
4
5
6
7
8
9
10
11
12
13
14
15
16
17
18
19
20
21
22
23
24
25
26
27
28
29
30
31
32
33
34
35
36
37
38
39
40
41
42
43
44
45
46
47
48
49
50
51
52
53
54
55
56
57
58
59
60
61
然后重启 Nginx 或者 nginx -s reload,访问 http://your-domain/,就能看到已经美化过的页面效果,如下图所示(light 风格):
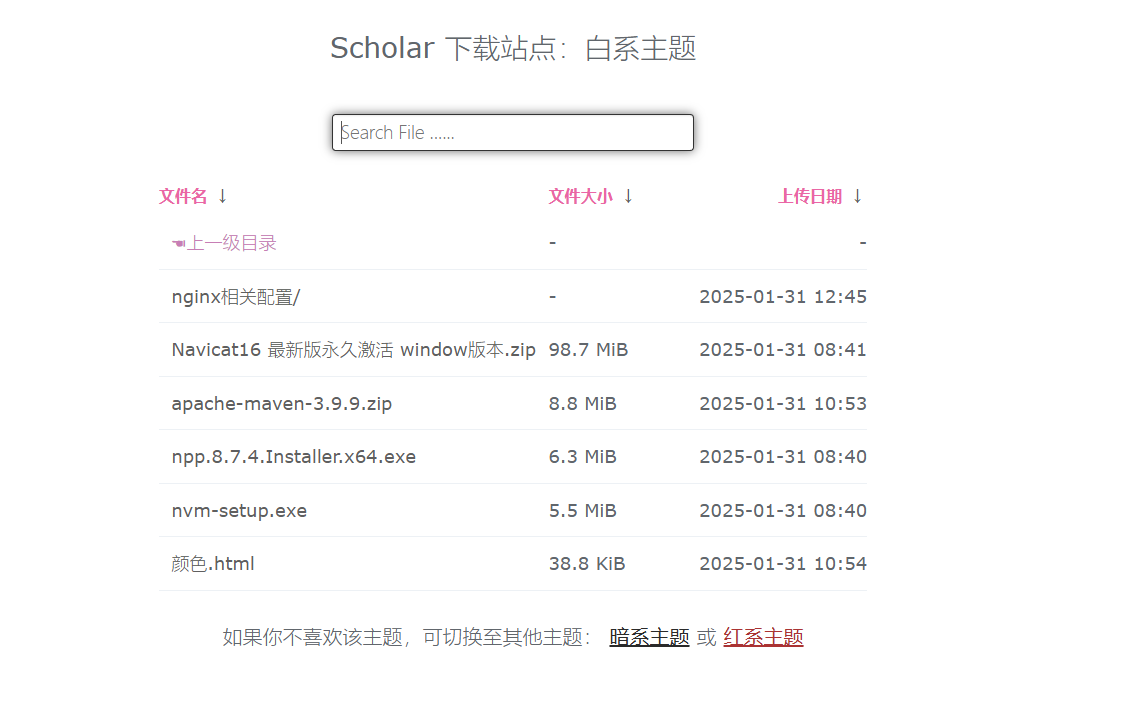
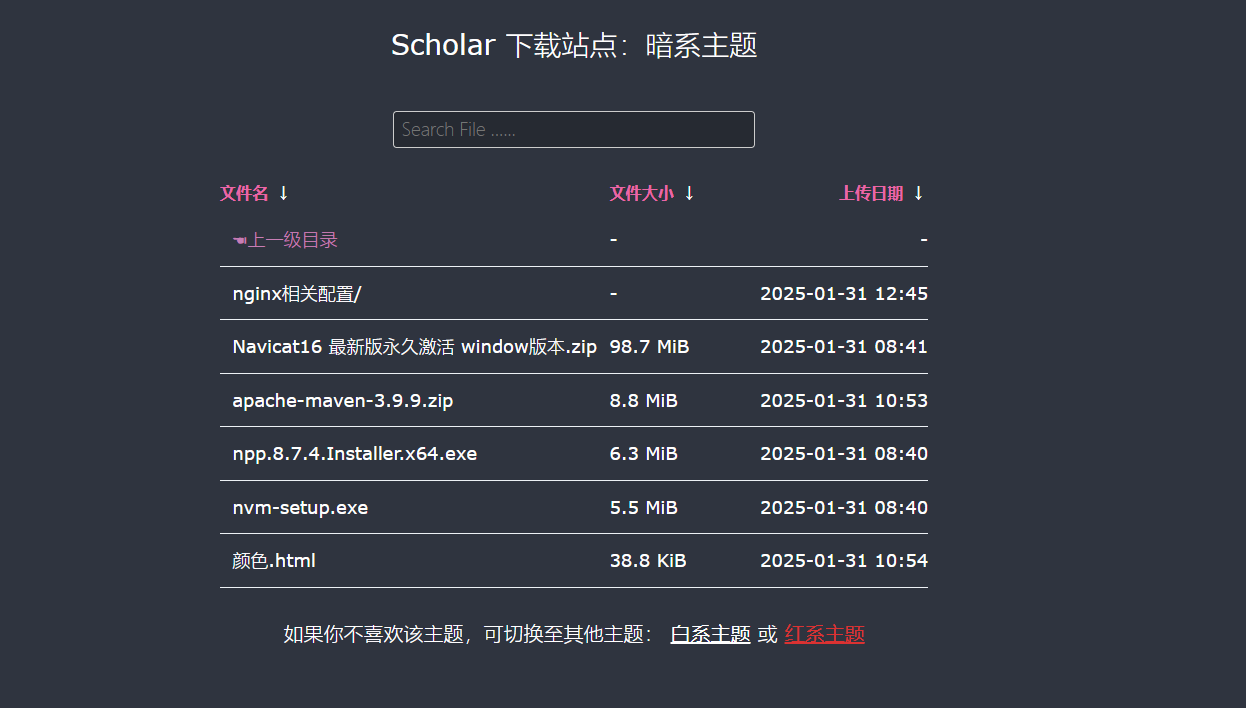
同一个主题还提供了 dark和red 风格,可在 fancyindex.conf 中进行切换,如下图所示(dark 风格):
如果你想调整主题的默认风格、图标大小、文字颜色等,可在 Nginx-Fancyindex-Theme 或对应的 CSS 文件中修改。
笔记
当配置完下载站点及其美化以后,不要在下载站点根目录放index.html文件,原因如下:
- 如果
index.html存在,Nginx 会自动打开index.html。 - 只有
index.html不存在,Nginx 才会显示目录列表(Fancyindex)。