 Spring集成Swagger2
# Spring 集成 Swagger2
前言
现在要维护的项目是前几年的旧项目,架构是Spring5 + SpringMVC + SpringJDBC,并非SpringBoot项目,SpringBoot项目集成相对更简单一点。
单纯Spring项目集成Swagger的情况不多,网上虽有例子,但是因项目各自情况,照搬总有错误,因此把自己的经验记录下来。
# 一、引入依赖
首先,需要在项目的 pom.xml 文件中添加 Swagger2 相关的依赖项。确保项目使用的是 Maven 作为构建工具。
<dependencies>
    <!-- Swagger2 核心依赖 -->
    <dependency>
        <groupId>io.springfox</groupId>
        <artifactId>springfox-swagger2</artifactId>
        <version>2.9.2</version>
    </dependency>

    <!-- Swagger2 UI 依赖,用于生成可视化的 API 文档界面 -->
    <dependency>
        <groupId>io.springfox</groupId>
        <artifactId>springfox-swagger-ui</artifactId>
        <version>2.9.2</version>
    </dependency>

    <!-- 其他必要依赖(根据项目实际情况添加) -->
</dependencies>
2
3
4
5
6
7
8
9
10
11
12
13
14
15
16
17
说明:
springfox-swagger2:Swagger2 的核心依赖,用于生成 API 文档。springfox-swagger-ui:提供 Swagger 的前端界面,便于查看和测试 API。
注意事项:
- 确保项目中不存在 Swagger 相关的版本冲突,避免因依赖版本不兼容导致的问题。
- 如果项目中使用了 Spring Boot 以外的其他配置管理工具,需根据实际情况调整依赖管理。
# 二、Swagger 配置
# 创建 Swagger 配置类
在项目中创建一个专门的配置类,用于配置 Swagger 的各项参数。
package com.scholar.config;

import org.springframework.beans.factory.annotation.Value;
import org.springframework.context.annotation.Bean;
import org.springframework.context.annotation.Configuration;
import org.springframework.context.annotation.ComponentScan;
import org.springframework.context.annotation.PropertySource;
import org.springframework.web.servlet.config.annotation.EnableWebMvc;

import springfox.documentation.builders.ApiInfoBuilder;
import springfox.documentation.builders.PathSelectors;
import springfox.documentation.builders.RequestHandlerSelectors;
import springfox.documentation.service.ApiInfo;
import springfox.documentation.service.Contact;
import springfox.documentation.spi.DocumentationType;
import springfox.documentation.spring.web.plugins.Docket;
import springfox.documentation.swagger2.annotations.EnableSwagger2;

/**
 * Swagger 配置类
 *
 * 该类用于配置 Swagger2 的基本参数,包括扫描的包路径、API 信息等。
 *
 * @Author xhp
 * @Date 2022/10/26
 */
@Configuration
@EnableSwagger2  // 启用 Swagger2
@EnableWebMvc     // 启用 Spring MVC
@ComponentScan(basePackages = {
    "com.scholar.controller"  // 扫描的控制器包路径
})
@PropertySource(value = "classpath:config/config.properties", ignoreResourceNotFound = true) // 加载配置文件
public class SwaggerConfig {

    // 从配置文件中读取 Swagger 启用状态
    @Value("${swagger.enabled}")
    private boolean enabled;

    /**
     * 创建 Docket Bean,配置 Swagger 的核心参数
     *
     * @return Docket 对象
     */
    @Bean
    public Docket createRestApi() {
        return new Docket(DocumentationType.SWAGGER_2)
                .enable(enabled)  // 根据配置文件决定是否启用 Swagger
                .apiInfo(apiInfo())  // 设置 API 基本信息
                .select()
                // 仅扫描带有 @ApiOperation 注解的方法
                .apis(RequestHandlerSelectors.withMethodAnnotation(io.swagger.annotations.ApiOperation.class))
                // 选择所有路径
                .paths(PathSelectors.any())
                .build();
    }

    /**
     * 配置 API 的基本信息,如标题、描述、联系人等
     *
     * @return ApiInfo 对象
     */
    private ApiInfo apiInfo() {
        return new ApiInfoBuilder()
                .title("标题:***_接口文档")  // 设置文档标题
                .description("这里是接口文档的详细描述信息")  // 设置文档描述
                .contact(new Contact("scholar", "https://example.com", "scholar@example.com"))  // 设置联系人信息
                .version("版本号:2.0")  // 设置版本号
                .build();
    }


    public boolean isEnabled() {
        return enabled;
    }

    public void setEnabled(boolean enabled) {
        this.enabled = enabled;
    }
}
2
3
4
5
6
7
8
9
10
11
12
13
14
15
16
17
18
19
20
21
22
23
24
25
26
27
28
29
30
31
32
33
34
35
36
37
38
39
40
41
42
43
44
45
46
47
48
49
50
51
52
53
54
55
56
57
58
59
60
61
62
63
64
65
66
67
68
69
70
71
72
73
74
75
76
77
78
79
80
详细说明:
- 注解解析:
@Configuration:声明这是一个配置类。@EnableSwagger2:启用 Swagger2 功能。@EnableWebMvc:启用 Spring MVC 功能。@ComponentScan:指定扫描的包路径,确保 Swagger 能够扫描到控制器。@PropertySource:加载外部配置文件,用于管理 Swagger 的启用状态。
- Docket Bean:
DocumentationType.SWAGGER_2:指定文档类型为 Swagger2。.enable(enabled):根据配置文件决定是否启用 Swagger,方便在不同环境下控制 Swagger 的启停。.apiInfo(apiInfo()):设置 API 的基本信息。.select():开始构建 API 选择器。.apis(RequestHandlerSelectors.withMethodAnnotation(ApiOperation.class)):仅扫描带有@ApiOperation注解的方法,避免扫描无关的类和方法。.paths(PathSelectors.any()):扫描所有路径。
- ApiInfo 配置:
title:设置文档标题。description:设置文档描述。contact:设置联系信息,可以填写姓名、网址和邮箱。version:设置文档版本。
# 常见错误及解决方案
在集成 Swagger2 的过程中,可能会遇到以下常见错误及其解决方案:
错误提示:
Unable to infer base url. This is common when using dynamic servlet registration or when the API is behind an API Gateway...原因: 缺少
@EnableWebMvc注解,导致 Swagger 无法正确推断基础 URL。解决方案: 在 Swagger 配置类上添加
@EnableWebMvc注解。@EnableWebMvc1错误提示:
No operations defined in spec!原因: 缺少
@ComponentScan注解或扫描的包路径不正确,导致 Swagger 未能扫描到任何 API 操作。解决方案: 确保在 Swagger 配置类上添加
@ComponentScan注解,并正确指定控制器所在的包路径。@ComponentScan(basePackages = { "com.xhp.controller" // 确保此路径正确 })1
2
3个别开发者在项目中出现
Unable to infer base url弹窗错误原因: 该错误可能由多种原因引起,如本地环境配置问题、依赖版本不兼容等。
解决方案:
- 确认所有开发者的项目依赖版本一致。
- 尝试降低 Swagger 版本,例如使用
2.6.0版本。 - 检查网络配置和代理设置,确保 Swagger UI 能够正常访问 API 文档。
<!-- 降低 Swagger 版本 -->
<dependency>
    <groupId>io.springfox</groupId>
    <artifactId>springfox-swagger2</artifactId>
    <version>2.6.0</version>
</dependency>
<dependency>
    <groupId>io.springfox</groupId>
    <artifactId>springfox-swagger-ui</artifactId>
    <version>2.6.0</version>
</dependency>
1
2
3
4
5
6
7
8
9
10
11
# 三、配置资源访问权限
在项目中通常会使用权限控制框架,如 Apache Shiro、Spring Security 或自定义的拦截器(Interceptor)来控制访问权限。为了确保 Swagger 的资源能够被正常访问,需要在权限控制配置中为 Swagger 提供的资源路径添加免认证权限。
需要添加的 URL 路径:
/swagger-ui.html:Swagger UI 的主页面。/webjars/**:Swagger UI 所需的静态资源,如 JavaScript、CSS 等。
示例:基于 Spring Security 的配置
import org.springframework.security.config.annotation.web.builders.HttpSecurity;
import org.springframework.security.config.annotation.web.configuration.WebSecurityConfigurerAdapter;

@Configuration
public class SecurityConfig extends WebSecurityConfigurerAdapter {

    @Override
    protected void configure(HttpSecurity http) throws Exception {
        http
            // 其他安全配置
            .authorizeRequests()
                // 允许访问 Swagger UI
                .antMatchers("/swagger-ui.html").permitAll()
                .antMatchers("/webjars/**").permitAll()
                // 其他路径需要认证
                .anyRequest().authenticated()
            .and()
            // 其他配置,如表单登录、HTTP Basic 等
            .formLogin()
            .and()
            .httpBasic();
    }
}
2
3
4
5
6
7
8
9
10
11
12
13
14
15
16
17
18
19
20
21
22
23
说明:
antMatchers("/swagger-ui.html").permitAll():允许所有用户访问 Swagger UI 页面。antMatchers("/webjars/**").permitAll():允许所有用户访问 Swagger UI 所需的静态资源。anyRequest().authenticated():其他所有请求需要认证。
注意事项:
- 根据实际使用的权限框架调整配置。
- 确保以上配置在权限框架的规则中优先级较高,避免被其他规则覆盖。
# 四、编写测试接口类
为了验证 Swagger 的集成是否成功,可以编写一个简单的控制器类,并添加 Swagger 的注解。
package com.scholar.controller;

import org.springframework.stereotype.Controller;
import org.springframework.web.bind.annotation.GetMapping;
import org.springframework.web.bind.annotation.RequestMapping;

import io.swagger.annotations.Api;
import io.swagger.annotations.ApiOperation;
import com.xhp.model.ApiResult;
import com.xhp.model.User;

/**
 * Swagger 测试控制器
 *
 * 用于测试 Swagger 文档的生成情况。
 *
 * @Author scholar
 * @Date 2022/10/26
 */
@Api(tags = "接口文档测试")  // Swagger 标签,用于分组展示
@RequestMapping("/test")
@Controller
public class SwaggerTestController {

    /**
     * 测试接口
     *
     * @return ApiResult 包装的 User 对象
     */
    @ApiOperation("测试接口")  // 描述该接口的功能
    @GetMapping("/test")
    public ApiResult<User> test() {
        // 模拟返回一个成功的响应
        return ApiResult.success(new User("John Doe", "john.doe@example.com"));
    }
}
2
3
4
5
6
7
8
9
10
11
12
13
14
15
16
17
18
19
20
21
22
23
24
25
26
27
28
29
30
31
32
33
34
35
36
@Api(tags = "接口文档测试"):用于标识该控制器属于哪个 Swagger 标签,便于在文档中分组展示。@ApiOperation("测试接口"):描述该方法的功能,显示在 Swagger 文档中。
# 五、查看接口文档
完成上述配置和编写测试接口后,可以启动项目并访问 Swagger UI 界面查看生成的 API 文档。
启动项目: 使用 IDE 或命令行工具启动 Spring 应用。
访问 Swagger UI: 在浏览器中输入以下地址:
http://<项目基础路径>/swagger-ui.html1示例:
http://localhost:8080/swagger-ui.html1查看文档: 成功访问后,您将看到类似以下的界面:
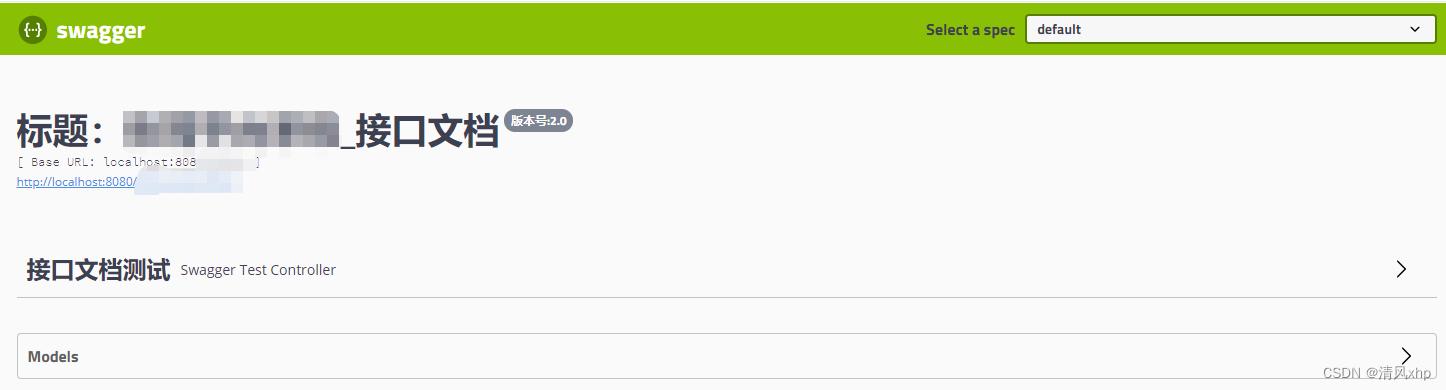
测试接口: 在 Swagger UI 中,可以看到
接口文档测试分组下的测试接口,点击接口名称可以查看详细信息,并可以直接在界面上进行接口测试。
# 六、功能扩展:通过配置文件管理 Swagger 启停
在我们实际开发中,通常希望在开发和测试环境中启用 Swagger,而在生产环境中禁用。为了实现这一需求,可以通过配置文件来管理 Swagger 的启用状态。
# 1. 配置文件中添加 Swagger 开关
在项目的配置文件(如 config.properties)中添加一个配置项,用于控制 Swagger 的启用状态。
# config/config.properties

# Swagger 开关
swagger.enabled=true
2
3
4
说明:
swagger.enabled:布尔类型,用于控制 Swagger 的启用(true)或禁用(false)。
# 2. 修改 Swagger 配置类以读取配置项
在之前创建的 SwaggerConfig 类中,添加对配置项的读取,并根据配置项决定是否启用 Swagger。
package com.scholar.config;

import org.springframework.beans.factory.annotation.Value;
import org.springframework.context.annotation.Bean;
import org.springframework.context.annotation.Configuration;
import org.springframework.context.annotation.ComponentScan;
import org.springframework.context.annotation.PropertySource;
import org.springframework.web.servlet.config.annotation.EnableWebMvc;

import springfox.documentation.builders.ApiInfoBuilder;
import springfox.documentation.builders.PathSelectors;
import springfox.documentation.builders.RequestHandlerSelectors;
import springfox.documentation.service.ApiInfo;
import springfox.documentation.service.Contact;
import springfox.documentation.spi.DocumentationType;
import springfox.documentation.spring.web.plugins.Docket;
import springfox.documentation.swagger2.annotations.EnableSwagger2;

/**
 * Swagger 配置类
 *
 * 通过配置文件控制 Swagger 的启用与否。
 *
 * @Author scholar
 * @Date 2022/10/26
 */
@Configuration
@EnableSwagger2
@EnableWebMvc
@ComponentScan(basePackages = {
    "com.xhp.controller"
})
@PropertySource(value = "classpath:config/config.properties", ignoreResourceNotFound = true)
public class SwaggerConfig {

    // 从配置文件中读取 Swagger 启用状态,默认为 true
    @Value("${swagger.enabled:true}")
    private boolean enabled;

    /**
     * 创建 Docket Bean,配置 Swagger 的核心参数
     *
     * @return Docket 对象
     */
    @Bean
    public Docket createRestApi() {
        return new Docket(DocumentationType.SWAGGER_2)
                .enable(enabled)  // 根据配置文件决定是否启用 Swagger
                .apiInfo(apiInfo())
                .select()
                .apis(RequestHandlerSelectors.withMethodAnnotation(io.swagger.annotations.ApiOperation.class))
                .paths(PathSelectors.any())
                .build();
    }

    /**
     * 配置 API 的基本信息,如标题、描述、联系人等
     *
     * @return ApiInfo 对象
     */
    private ApiInfo apiInfo() {
        return new ApiInfoBuilder()
                .title("标题:***_接口文档")
                .description("这里是接口文档的详细描述信息")
                .contact(new Contact("scholar", "https://example.com", "scholar@example.com"))
                .version("版本号:2.0")
                .build();
    }

    // Getter 和 Setter 方法

    public boolean isEnabled() {
        return enabled;
    }

    public void setEnabled(boolean enabled) {
        this.enabled = enabled;
    }
}
2
3
4
5
6
7
8
9
10
11
12
13
14
15
16
17
18
19
20
21
22
23
24
25
26
27
28
29
30
31
32
33
34
35
36
37
38
39
40
41
42
43
44
45
46
47
48
49
50
51
52
53
54
55
56
57
58
59
60
61
62
63
64
65
66
67
68
69
70
71
72
73
74
75
76
77
78
79
说明:
@Value("${swagger.enabled:true}"):从配置文件中读取swagger.enabled的值,如果未配置则默认为true。.enable(enabled):根据读取到的配置项决定是否启用 Swagger。
# 3. 切换环境时修改配置文件
根据不同的部署环境,修改 config.properties 中的 swagger.enabled 配置项。
开发/测试环境:
swagger.enabled=true1生产环境:
swagger.enabled=false1
注意事项:
- 确保配置文件在不同环境中正确加载。
- 部署到生产环境时,务必将
swagger.enabled设置为false,以避免暴露内部 API 文档。
# 七、实战案例
# 1. 实体类 (Product.java)
/**
 * 产品实体类
 */
@ApiModel(description = "产品实体,包含产品的基本信息")
public class Product {

    @ApiModelProperty(value = "产品ID", example = "1001", required = true)
    private Long id;

    @ApiModelProperty(value = "产品名称", example = "智能手机", required = true)
    private String name;

    // 构造方法
    public Product() {}

    public Product(Long id, String name) {
        this.id = id;
        this.name = name;
    }

    // Getter 和 Setter

}
2
3
4
5
6
7
8
9
10
11
12
13
14
15
16
17
18
19
20
21
22
23
# 2. 控制器类 (ProductController.java)
/**
 * 产品管理控制器
 */
@Api(tags = "产品管理", description = "产品的获取与创建接口")
@RestController
@RequestMapping("/api/products")
public class ProductController {

    private List<Product> products = new ArrayList<>();

    /**
     * 获取所有产品
     */
    @ApiOperation(value = "获取产品列表", notes = "返回所有产品的信息")
    @ApiResponses({
        @ApiResponse(code = 200, message = "成功获取产品列表"),
        @ApiResponse(code = 500, message = "服务器错误")
    })
    @GetMapping
    public ResponseEntity<List<Product>> getAllProducts() {
        return new ResponseEntity<>(products, HttpStatus.OK);
    }

    /**
     * 创建新产品
     */
    @ApiOperation(value = "创建产品", notes = "根据提供的信息创建新产品")
    @ApiResponses({
        @ApiResponse(code = 201, message = "产品创建成功"),
        @ApiResponse(code = 400, message = "无效的产品信息")
    })
    @ApiParam(value = "产品信息", required = true)
    @PostMapping
    public ResponseEntity<Product> createProduct(@RequestBody Product product) {
        products.add(product);
        return new ResponseEntity<>(product, HttpStatus.CREATED);
    }

}
2
3
4
5
6
7
8
9
10
11
12
13
14
15
16
17
18
19
20
21
22
23
24
25
26
27
28
29
30
31
32
33
34
35
36
37
38
39
- 实体类:
@ApiModel:描述实体类的整体信息。@ApiModelProperty:描述实体类中各个属性的信息。
- 控制器类:
@Api:标识控制器类为 Swagger 的资源,并提供分组和描述信息。@ApiOperation:描述具体的 API 操作。@ApiResponses和@ApiResponse:列举接口可能的响应状态。@ApiParam:描述接口方法的参数。