 Spring6 - Bean的作用域
# Bean的6种作用域
在Spring Framework中,总共定义了6种bean 的作用域,其中有4种作用域只有当应用为web应用的时候才有效,并且Spring还支持自定义作用域。
下表描述了这6种作用域:
1. singleton (opens new window)(单例)
- 描述:这是默认的作用域。对于 Spring IoC 容器中的每个 Bean 定义,容器只会创建一个 Bean 实例。所有对该 Bean 的请求,都返回相同的实例,即它们都指向同一个对象地址。
- 适用范围:全局,适用于单个 Spring IoC 容器。
2. prototype (opens new window)(原型)
- 描述:对于每个 Bean 请求,容器都会创建一个新的 Bean 实例。因此,每次调用
getBean()方法时,都会返回一个新的对象。 - 适用范围:任何情况,每次请求都创建一个新实例。
- 描述:每次 HTTP 请求都会创建一个新的 Bean,该 Bean 仅在当前 HTTP 请求内有效。
- 适用范围:仅适用于 WebApplicationContext 环境。每个请求一个实例。
- 描述:每个 HTTP Session 都会创建一个新的 Bean,该 Bean 仅在当前 HTTP Session 内有效。
- 适用范围:仅适用于 WebApplicationContext 环境。每个会话一个实例。
5. application (opens new window)
- 描述:每个 ServletContext 都会创建一个新的 Bean,该 Bean 在整个应用的生命周期内有效。
- 适用范围:仅适用于 WebApplicationContext 环境。每个应用一个实例。
6. websocket (opens new window)
- 描述:每个 WebSocket 会话都会创建一个新的 Bean,该 Bean 仅在当前 WebSocket 会话内有效。
- 适用范围:仅适用于 WebApplicationContext 环境。每个 WebSocket 会话一个实例。
# 1. singleton作用域
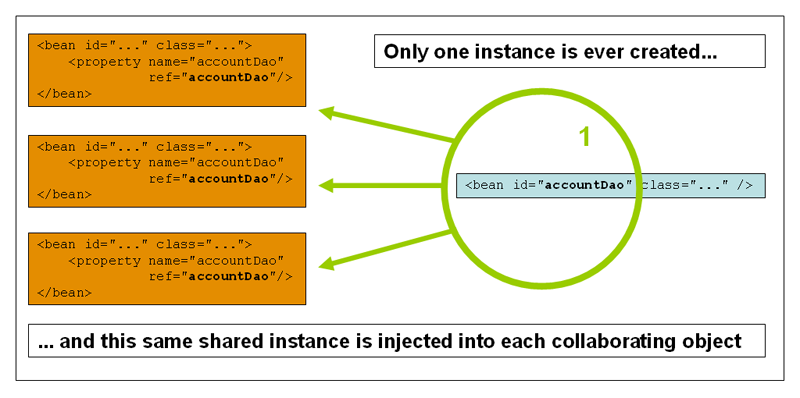
singleton作用域表示在整个Spring容器中一个bean定义只生成了唯一的一个bean实例,被Spring容器管理。所有对这个bean的请求和引用都会返回这个bean实例。
下面的图说明了singleton作用域是如何工作的:

上图中,有3个地方引用了这个
bean,这3个引用指向的都是同一个bean实例。
singleton作用域是Spring中默认的作用域,可以在定义bean的时候指定或者不指定都可以,如下:
<!-- 不指定作用域,默认是singleton -->
<bean id="accountService" class="com.something.DefaultAccountService"/>

<!-- 显示指定作用域为singleton -->
<bean id="accountService" class="com.something.DefaultAccountService" scope="singleton"/>
2
3
4
5
当使用注解定义bean的时候,你可以通过 @Scope 注解来指定一个 Bean 的作用域
import org.springframework.context.annotation.Scope;
import org.springframework.stereotype.Component;

@Component
@Scope("singleton") // 或者 @Scope(value = "singleton")
public class SingletonService {
    // 类实现
}
2
3
4
5
6
7
8
使用注解后可以使用一下方式进行测试:
public class Application {

    public static void main(String[] args) {

        // 创建基于注解的应用上下文
        ApplicationContext context = new AnnotationConfigApplicationContext(SingletonService.class);
        for (int i = 0; i < 5; i++) {
            SingletonService singleton = context.getBean(SingletonService.class);
            System.out.println(singleton);
        }
    }
}
2
3
4
5
6
7
8
9
10
11
12
# 2. prototype作用域
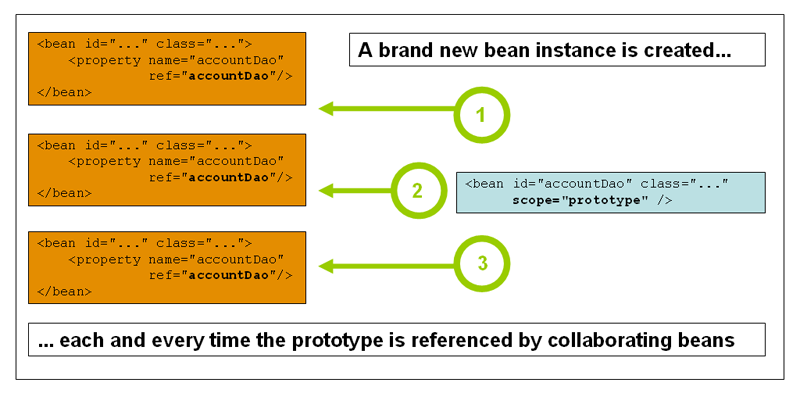
prototype作用域表示的是一个bean定义可以创建多个bean实例,有点像一个类可以new多个实例一样。
也就是说,当注入到其他的bean中或者对这个bean定义调用getBean()时,都会生成一个新的bean实例。
作为规则,应该对所有有状态的
bean指定prototype作用域,对所有无状态的bean指定singleton作用域。
下图描述了prototype作用域是如何工作的:

上图中,每个引用对应一个新的
bean实例。请注意,上图中的例子不适用于生产环境。因为
DAO通常来说是无状态的bean,应该指定它的作用域为singleton比较合适。
在xml中可以这样定义prototype作用域:
<bean id="accountService" class="com.something.DefaultAccountService" scope="prototype"/>
和其他作用域不同的是,
Spring并不管理作用域为prototype的bean的整个生命周期。Spring容器实例化它、配置它、组装它,然后就将bean交给给使用者了,之后就不会对这个bean进行管理了。因此,Spring不会调用该bean的销毁生命周期回调,使用者必须自己销毁 这个bean并释放资源。如果想让Spring来销毁它并释放资源,请使用自定义的bean post-processor (opens new window)。
当使用注解定义bean的时候,你可以通过 @Scope 注解来指定一个 Bean 的作用域
import org.springframework.context.annotation.Scope;
import org.springframework.stereotype.Component;

@Component
@Scope("prototype") // 或者 @Scope(value = "prototype")
public class PrototypeService {
    // 类实现
}
2
3
4
5
6
7
8
使用注解后可以使用一下方式进行测试:
public class Application {

    public static void main(String[] args) {

        // 创建基于注解的应用上下文
        ApplicationContext context = new AnnotationConfigApplicationContext(PrototypeService.class);
        for (int i = 0; i < 5; i++) {
            PrototypeService prototype = context.getBean(PrototypeService.class);
            System.out.println(prototype);
        }
    }
}
2
3
4
5
6
7
8
9
10
11
12
# 3. 当singleton的bean依赖prototype的bean
当singleton的bean依赖prototype的bean时,请注意,这个依赖关系是在实例化时候解析的,并且只解析一次。因此,每个依赖的prototype的bean都是一个新的bean实例。
然而,如果一个singleton的bean想要在运行时,在每次注入时都能有一个新的prototype的bean生成并注入,这是不行的。因为依赖注入在初始化的时候只会注入一次。如果想要在运行时多次注入新的prototype的bean,请参考Method Injection (opens new window)。
# 4. request、session、application、websocket作用域
request、session、application、websocket作用域只有在web环境下才有用。
# 4.1 初始化web配置
为了支持request、session、application、websocket作用域,在定义bean之前需要一些初始化配置。
如何完成这个初始化配置取决于你的特定Servlet环境。
如果你在Spring Web MVC中定义这4中作用域,不需要进行初始化配置。因为,Spring使用的DispatcherServlet已经公开了所有相关的状态。
# Servlet 2.5 Web 容器配置
在 Servlet 2.5 或更早版本的 Web 容器中,Spring 的 DispatcherServlet 可能不会自动暴露 HTTP 请求和会话的上下文给 Spring 容器。在这种情况下,为了让 Spring 能够管理 request 或 session 作用域的 Bean,你需要在 web.xml 配置文件中显式地注册 RequestContextListener。
<web-app>
    ...
    <listener>
        <!-- 注册 RequestContextListener 来让 Spring 框架感知 HTTP 请求和会话的上下文,
        这是必须的步骤,以便 Spring 能够管理那些声明为 request 或 session 作用域的 Bean。 -->
        <listener-class>org.springframework.web.context.request.RequestContextListener</listener-class>
    </listener>
    ...
</web-app>
2
3
4
5
6
7
8
9
# Servlet 3.0+ Web 容器配置
对于 Servlet 3.0 及以上版本的 Web 容器,如果不是通过 Spring 的 DispatcherServlet 来处理请求(即在非 Spring MVC 应用中),你同样需要确保 Spring 能够管理 request 和 session 作用域的 Bean。除了使用 RequestContextListener,你也可以选择配置 RequestContextFilter,尤其是当 RequestContextListener 的配置遇到问题时。
<web-app>
    ...
    <!-- RequestContextFilter 确保每次 HTTP 请求都能被 Spring 框架感知,
    这样 Spring 就可以正确地处理 request 和 session 作用域的 Bean。 -->
    <filter>
        <filter-name>requestContextFilter</filter-name>
        <filter-class>org.springframework.web.filter.RequestContextFilter</filter-class>
    </filter>
    <filter-mapping>
        <filter-name>requestContextFilter</filter-name>
        <!-- 通过 "/*" 模式确保所有的 HTTP 请求都会经过这个过滤器 -->
        <url-pattern>/*</url-pattern>
    </filter-mapping>
    ...
</web-app>
2
3
4
5
6
7
8
9
10
11
12
13
14
15
DispatcherServlet、RequestContextListener和RequestContextFilter 共同做了相同的事,即将HTTP请求对象绑定到服务该请求的线程。这使得请求作用域和会话作用域的bean在调用链的更下游可用。
# Spring 项目 Web 容器配置
对于非 Spring Boot 的传统 Spring 项目,如果你想使用 Spring Web MVC 功能,可以添加 Spring Web MVC 的依赖:
<dependency>
    <groupId>org.springframework</groupId>
    <artifactId>spring-webmvc</artifactId>
    <version>5.3.15</version> <!-- 使用最新的兼容版本 -->
</dependency>
2
3
4
5

# 4.2 request作用域
下面的xml配置指定了bean的作用域为request:
<bean id="loginAction" class="com.something.LoginAction" scope="request"/>
Spring为每一个HTTP请求创建一个新的LoginAction的bean。每个bean之间不可见,当请求结束,对应的bean将被丢弃。
当使用注解定义bean的时候,可以通过使用@RequestScope注解设定request作用域:
@RequestScope
@Component
public class LoginAction {
    // ...
}
2
3
4
5
# 4.3 session作用域
在xml中可以这样定义bean的作用域为session作用域:
<bean id="userPreferences" class="com.something.UserPreferences" scope="session"/>
Spring为每个HTTP Session创建一个新的UserPreferences的bean。每个bean之间是不可见的,只属于对应的Session,当Session销毁的时候,对应的bean也会被销毁。
当使用注解定义bean的时候,可以通过@SessionScope注解设定session作用域:
@SessionScope
@Component
public class UserPreferences {
    // ...
}
2
3
4
5
# 4.4 application作用域
在xml中可以这样定义bean的作用域为application作用域:
<bean id="appPreferences" class="com.something.AppPreferences" scope="application"/>
Spring为整个web上下文创建一个AppPreferences 的bean。也就是说,这个bean作用域是在ServletContext级别,它是作为ServletContext的一个属性存在的。
这和singleton作用域很像,但是有两点不同:
application作用域的bean是每个ServletContext只有一个;而singleton作用域是每个Spring的ApplicationContext只有一个。两者的范围不同。application作用域的bean是属于ServletContext的,作为ServletContext的属性,是可见的。
当使用注解定义bean的时候,可以通过@ApplicationScope注解设定application作用域:
@ApplicationScope
@Component
public class AppPreferences {
    // ...
}
2
3
4
5
# 4.5 被设定了作用域的bean作为依赖项注入
当你尝试将一个作用域较短的 Bean 注入到作用域较长的 Bean 中时(例如,将 request 作用域的 Bean 注入到 singleton 作用域的 Bean 中),会遇到问题,因为作用域较长的 Bean 只会在应用启动时创建一次,而作用域较短的 Bean 在其生命周期结束后就会被销毁,这会导致作用域较长的 Bean 持有一个已经被销毁的 Bean 的引用。
为了解决这个问题,Spring 允许使用所谓的 scoped-proxy。scoped-proxy 允许你在作用域较长的 Bean 中注入一个作用域较短的 Bean 的代理,这个代理会确保每次调用作用域较短的 Bean 时,都能够获取到正确的实例。(详见官方文档 (opens new window))
在 XML 配置中,你可以通过 <aop:scoped-proxy/> 子标签来为 Bean 创建一个代理:
<bean id="myBean" class="com.example.MyBean" scope="request">
    <aop:scoped-proxy/>
</bean>
2
3
在使用注解配置时,可以通过 @Scope 注解的 proxyMode 属性来配置:
@Component
@Scope(value = "request", proxyMode = ScopedProxyMode.TARGET_CLASS)
public class MyBean {
    // ...
}
2
3
4
5
proxyMode 属性有几个选项:
ScopedProxyMode.NO:不创建代理(默认值)。ScopedProxyMode.INTERFACES:通过 JDK 动态代理技术创建代理,仅代理目标 Bean 实现的接口。ScopedProxyMode.TARGET_CLASS:通过 CGLIB 创建代理,代理整个目标类。ScopedProxyMode.DEFAULT:默认方式,通常等同于NO。
使用 scoped-proxy,每次从代理访问作用域较短的 Bean 时,Spring 容器都会返回当前作用域中正确的 Bean 实例。这种方式对使用者来说是透明的,使用者不需要知道代理的存在,就像直接使用作用域较短的 Bean 一样。
# 5.自定义作用域Scope
在 Spring 中,除了内置的作用域(如 singleton, prototype, request, session, application)之外,你还可以自定义作用域。自定义作用域允许你控制 Bean 的生命周期行为,以满足特定的业务需求。
实现 Scope 接口:首先,你需要创建一个类来实现 Spring 的
org.springframework.beans.factory.config.Scope接口。注册自定义作用域:在 Spring 配置中注册你的自定义作用域。
使用自定义作用域:在 Bean 定义中使用你的自定义作用域。
# 1. 实现 Scope 接口
Scope 接口定义了几个方法,用于管理 Bean 的生命周期。以下是一个简单的自定义作用域实现示例:
import org.springframework.beans.factory.ObjectFactory;
import org.springframework.beans.factory.config.Scope;

public class MyCustomScope implements Scope {

    @Override
    public Object get(String name, ObjectFactory<?> objectFactory) {
        // 从自定义的存储中获取 Bean,如果不存在则创建一个新的实例
        return objectFactory.getObject();
    }

    @Override
    public Object remove(String name) {
        // 从自定义的存储中移除 Bean
        return null;
    }

    @Override
    public void registerDestructionCallback(String name, Runnable callback) {
        // 注册销毁回调,如果作用域支持销毁
    }

    @Override
    public Object resolveContextualObject(String key) {
        // 解析作用域相关的上下文对象
        return null;
    }

    @Override
    public String getConversationId() {
        // 返回当前作用域的会话ID
        return null;
    }
}
2
3
4
5
6
7
8
9
10
11
12
13
14
15
16
17
18
19
20
21
22
23
24
25
26
27
28
29
30
31
32
33
34
# 2. 注册自定义作用域
自定义作用域需要在 Spring 配置中注册。在 XML 配置中,可以使用 <bean> 标签注册自定义作用域。在 Java 配置中,可以使用 ConfigurableBeanFactory 的 registerScope 方法注册。
# 3. XML 配置
<beans xmlns="http://www.springframework.org/schema/beans"
       xmlns:context="http://www.springframework.org/schema/context"
       xsi:schemaLocation="http://www.springframework.org/schema/beans
       http://www.springframework.org/schema/beans/spring-beans.xsd
       http://www.springframework.org/schema/context
       http://www.springframework.org/schema/context/spring-context.xsd">

    <!-- 注册自定义作用域 -->
    <bean class="org.springframework.beans.factory.config.CustomScopeConfigurer">
        <property name="scopes">
            <map>
                <entry key="myCustomScope" value-ref="myCustomScope"/>
            </map>
        </property>
    </bean>

    <!-- 定义自定义作用域的实现 -->
    <bean id="myCustomScope" class="com.example.MyCustomScope"/>
</beans>
2
3
4
5
6
7
8
9
10
11
12
13
14
15
16
17
18
19
# 4. Java 配置
import org.springframework.context.annotation.Bean;
import org.springframework.context.annotation.Configuration;
import org.springframework.beans.factory.config.ConfigurableBeanFactory;

@Configuration
public class AppConfig {

    @Bean
    public static CustomScopeConfigurer customScopeConfigurer() {
        CustomScopeConfigurer configurer = new CustomScopeConfigurer();
        Map<String, Object> scopes = new HashMap<>();
        scopes.put("myCustomScope", new MyCustomScope());
        configurer.setScopes(scopes);
        return configurer;
    }
}
2
3
4
5
6
7
8
9
10
11
12
13
14
15
16
# 5. 使用自定义作用域
一旦自定义作用域注册完成,你就可以在 Bean 定义中通过 scope 属性来使用它了:
@Component
@Scope("myCustomScope")
public class MyScopedBean {
    // 类实现
}
2
3
4
5
或者在 XML 配置中指定作用域:
<bean id="myScopedBean" class="com.example.MyScopedBean" scope="myCustomScope"/>
这样,MyScopedBean 的生命周期就会根据 MyCustomScope 的实现来管理了。
