 Spring6 - 手写IOC容器
我们都知道,Spring 框架的 XML 是基于 Java 反射机制实现的,下面我们先回顾一下 Java 反射。
# 回顾 Java 反射
Java 反射机制是在运行状态中,对于任意一个类,都能够知道这个类的所有属性和方法;对于任意一个对象,都能够调用它的任意方法和属性;这种动态获取信息以及动态调用对象方法的功能称为 Java 语言的反射机制。简单来说,反射机制指的是程序在运行时能够获取自身的信息。
要想解剖一个类,必须先要 获取到该类的 Class 对象。而剖析一个类或用反射解决具体的问题就是使用相关 API
- Java.lang.Class
- Java.lang.reflect
所以,Class 对象是反射的根源。
# 1. 自定义类
package com.scholar.springIoc;

public class Car {

    // 属性
    private String name;
    private int age;
    private String color;

    // 无参数构造
    public Car() {
    }

    // 有参数构造
    public Car(String name, int age, String color) {
        this.name = name;
        this.age = age;
        this.color = color;
    }

    // 普通方法
    private void run() {
        System.out.println("私有方法-run.....");
    }

    //get和set方法
    public String getName() {
        return name;
    }
    public void setName(String name) {
        this.name = name;
    }
    public int getAge() {
        return age;
    }
    public void setAge(int age) {
        this.age = age;
    }
    public String getColor() {
        return color;
    }
    public void setColor(String color) {
        this.color = color;
    }

    @Override
    public String toString() {
        return "Car{" +
                "name='" + name + '\'' +
                ", age=" + age +
                ", color='" + color + '\'' +
                '}';
    }
}
1
2
3
4
5
6
7
8
9
10
11
12
13
14
15
16
17
18
19
20
21
22
23
24
25
26
27
28
29
30
31
32
33
34
35
36
37
38
39
40
41
42
43
44
45
46
47
48
49
50
51
52
53
54
2
3
4
5
6
7
8
9
10
11
12
13
14
15
16
17
18
19
20
21
22
23
24
25
26
27
28
29
30
31
32
33
34
35
36
37
38
39
40
41
42
43
44
45
46
47
48
49
50
51
52
53
54
# 2. 编写测试类
package com.scholar.springIoc;


import org.junit.jupiter.api.Test;

import java.lang.reflect.Constructor;
import java.lang.reflect.Field;
import java.lang.reflect.Method;

public class TestCar {

    // 1、获取 Class 对象多种方式
    @Test
    public void test01() throws Exception {
        // 1 类名.class
        Class clazz1 = Car.class;

        // 2 对象.getClass()
        Class clazz2 = new Car().getClass();

        // 3 Class.forName("全路径")
        Class clazz3 = Class.forName("com.scholar.springIoc.Car");

        // 实例化
        Car car = (Car)clazz3.getConstructor().newInstance();
        System.out.println(car);
    }

    // 2、获取构造方法
    @Test
    public void test02() throws Exception {
        Class clazz = Car.class;
        // 获取所有构造
        // getConstructors() 获取所有 public 的构造方法
        // Constructor[] constructors = clazz.getConstructors();
        // getDeclaredConstructors() 获取所有的构造方法 public private
        Constructor[] constructors = clazz.getDeclaredConstructors();
        for (Constructor c:constructors) {
            System.out.println("方法名称:"+c.getName()+" 参数个数:"+c.getParameterCount());
        }

        // 指定有参数构造创建对象
        // 1. 构造 public
        // Constructor c1 = clazz.getConstructor(String.class, int.class, String.class);
        // Car car1 = (Car)c1.newInstance("夏利", 10, "红色");
        // System.out.println(car1);

        // 2. 构造 private
        Constructor c2 = clazz.getDeclaredConstructor(String.class, int.class, String.class);
        c2.setAccessible(true);
        Car car2 = (Car)c2.newInstance("捷达", 15, "白色");
        System.out.println(car2);
    }

    // 3、获取属性
    @Test
    public void test03() throws Exception {
        Class clazz = Car.class;
        Car car = (Car)clazz.getDeclaredConstructor().newInstance();
        // 获取所有 public 属性
        // Field[] fields = clazz.getFields();
        // 获取所有属性(包含私有属性)
        Field[] fields = clazz.getDeclaredFields();
        for (Field field:fields) {
            if(field.getName().equals("name")) {
                //设置允许访问
                field.setAccessible(true);
                field.set(car,"五菱宏光");
                System.out.println(car);
            }
            System.out.println(field.getName());
        }
    }

    // 4、获取方法
    @Test
    public void test04() throws Exception {
        Car car = new Car("奔驰",10,"黑色");
        Class clazz = car.getClass();
        // 1. public方法
        Method[] methods = clazz.getMethods();
        for (Method m1:methods) {
            // System.out.println(m1.getName());
            // 执行方法 toString
            if(m1.getName().equals("toString")) {
                String invoke = (String)m1.invoke(car);
                // System.out.println("toString执行了:"+invoke);
            }
        }

        // 2. private方法
        Method[] methodsAll = clazz.getDeclaredMethods();
        for (Method m:methodsAll) {
            // 执行方法 run
            if(m.getName().equals("run")) {
                m.setAccessible(true);
                m.invoke(car);
            }
        }
    }
}
1
2
3
4
5
6
7
8
9
10
11
12
13
14
15
16
17
18
19
20
21
22
23
24
25
26
27
28
29
30
31
32
33
34
35
36
37
38
39
40
41
42
43
44
45
46
47
48
49
50
51
52
53
54
55
56
57
58
59
60
61
62
63
64
65
66
67
68
69
70
71
72
73
74
75
76
77
78
79
80
81
82
83
84
85
86
87
88
89
90
91
92
93
94
95
96
97
98
99
100
101
2
3
4
5
6
7
8
9
10
11
12
13
14
15
16
17
18
19
20
21
22
23
24
25
26
27
28
29
30
31
32
33
34
35
36
37
38
39
40
41
42
43
44
45
46
47
48
49
50
51
52
53
54
55
56
57
58
59
60
61
62
63
64
65
66
67
68
69
70
71
72
73
74
75
76
77
78
79
80
81
82
83
84
85
86
87
88
89
90
91
92
93
94
95
96
97
98
99
100
101

# 实现 Spring 的 IOC
我们知道,IOC(控制反转)和 DI(依赖注入)是 Spring 里面核心的东西,那么,我们如何自己手写出这样的代码呢?下面我们就一步一步写出 Spring 框架最核心的部分。
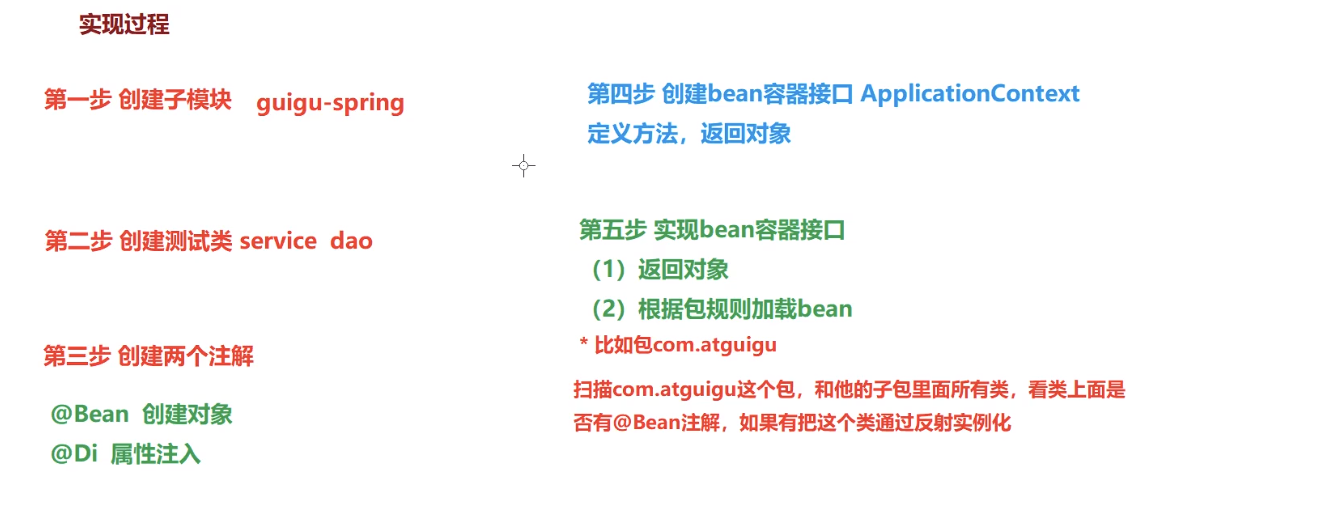
搭建子模块
搭建模块:guigu-Spring,搭建方式如其他 Spring 子模块
# 1. 准备测试需要的 Bean
添加依赖
<dependencies>
    <!--junit5测试-->
    <dependency>
        <groupId>org.junit.jupiter</groupId>
        <artifactId>junit-jupiter-api</artifactId>
        <version>5.3.1</version>
    </dependency>
</dependencies>
1
2
3
4
5
6
7
8
2
3
4
5
6
7
8
创建 UserDao 接口
package com.scholar.springIoc;

public interface UserDao {

    public void print();
}
1
2
3
4
5
6
2
3
4
5
6
创建 UserDaoImpl 实现
package com.scholar.springIoc;

public class UserDaoImpl implements UserDao {

    @Override
    public void print() {
        System.out.println("Dao层执行结束");
    }
}
1
2
3
4
5
6
7
8
9
2
3
4
5
6
7
8
9
创建 UserService 接口
package com.scholar.springIoc;

public interface UserService {

    public void out();
}
1
2
3
4
5
6
2
3
4
5
6
创建 UserServiceImpl 实现类
package com.scholar.springIoc;

public class UserServiceImpl implements UserService {

    // private UserDao userDao;

    @Override
    public void out() {
        // userDao.print();
        System.out.println("Service层执行结束");
    }
}
1
2
3
4
5
6
7
8
9
10
11
12
2
3
4
5
6
7
8
9
10
11
12
# 2. 定义注解
我们通过注解的形式加载 Bean 与实现依赖注入
Bean 注解
package com.scholar.springIoc;

import java.lang.annotation.ElementType;
import java.lang.annotation.Retention;
import java.lang.annotation.RetentionPolicy;
import java.lang.annotation.Target;

@Target(ElementType.TYPE)
@Retention(RetentionPolicy.RUNTIME)
public @interface Bean {
}
1
2
3
4
5
6
7
8
9
10
11
2
3
4
5
6
7
8
9
10
11
依赖注入注解
package com.scholar.springIoc;

import java.lang.annotation.ElementType;
import java.lang.annotation.Retention;
import java.lang.annotation.RetentionPolicy;
import java.lang.annotation.Target;

@Target({ElementType.FIELD})
@Retention(RetentionPolicy.RUNTIME)
public @interface Di {
}
1
2
3
4
5
6
7
8
9
10
11
2
3
4
5
6
7
8
9
10
11
说明:上面两个注解可以随意取名。
# 3. 定义 Bean 容器接口
package com.scholar.springIoc;

public interface ApplicationContext {

    Object getBean(Class clazz);
}
1
2
3
4
5
6
2
3
4
5
6
# 4. 编写注解 Bean 容器接口实现
AnnotationApplicationContext 基于注解扫描 Bean
package com.scholar.springIoc;

import java.io.File;
import java.net.URL;
import java.net.URLDecoder;
import java.util.Enumeration;
import java.util.HashMap;

/**
 * 实现自定义的ApplicationContext,用于通过注解加载和管理Bean。
 */
public class AnnotationApplicationContext implements ApplicationContext {

    // 存储 Bean 的容器,使用HashMap来存储类与实例的映射
    private HashMap<Class, Object> BeanFactory = new HashMap<>();
    private static String rootPath;

    /**
     * 通过给定类的Class对象,获取Bean实例。
     *
     * @param clazz 要获取的Bean的Class对象
     * @return 返回Bean的实例,如果不存在则返回null
     */
    @Override
    public Object getBean(Class clazz) {
        return BeanFactory.get(clazz);
    }

    /**
     * 构造方法,通过包名初始化ApplicationContext,扫描指定包下的所有类并加载标记为@Bean的类。
     *
     * @param basePackage 需要扫描的基包名
     */
    public AnnotationApplicationContext(String basePackage) {

    }
}
1
2
3
4
5
6
7
8
9
10
11
12
13
14
15
16
17
18
19
20
21
22
23
24
25
26
27
28
29
30
31
32
33
34
35
36
37
2
3
4
5
6
7
8
9
10
11
12
13
14
15
16
17
18
19
20
21
22
23
24
25
26
27
28
29
30
31
32
33
34
35
36
37
# 5. 编写扫描 Bean 逻辑
我们通过构造方法传入包的 base 路径,扫描被 @Bean 注解的 Java 对象,完整代码如下:
package com.scholar.springIoc;

import java.io.File;
import java.net.URL;
import java.net.URLDecoder;
import java.util.Enumeration;
import java.util.HashMap;

/**
 * 实现自定义的ApplicationContext,用于通过注解加载和管理Bean。
 */
public class AnnotationApplicationContext implements ApplicationContext {

    // 存储 Bean 的容器,使用HashMap来存储类与实例的映射
    private HashMap<Class, Object> BeanFactory = new HashMap<>();
    private static String rootPath;

    /**
     * 通过给定类的Class对象,获取Bean实例。
     *
     * @param clazz 要获取的Bean的Class对象
     * @return 返回Bean的实例,如果不存在则返回null
     */
    @Override
    public Object getBean(Class clazz) {
        return BeanFactory.get(clazz);
    }

    /**
     * 构造方法,通过包名初始化ApplicationContext,扫描指定包下的所有类并加载标记为@Bean的类。
     *
     * @param basePackage 需要扫描的基包名
     */
    public AnnotationApplicationContext(String basePackage) {
        try {
            // 将包路径转换为目录路径
            String packageDirName = basePackage.replaceAll("\\.", "\\\\");
            Enumeration<URL> dirs = Thread.currentThread().getContextClassLoader().getResources(packageDirName);
            while (dirs.hasMoreElements()) {
                URL url = dirs.nextElement();
                String filePath = URLDecoder.decode(url.getFile(), "utf-8");
                rootPath = filePath.substring(0, filePath.length() - packageDirName.length());
                loadBean(new File(filePath));
            }
        } catch (Exception e) {
            throw new RuntimeException(e);
        }
    }

    /**
     * 递归扫描文件夹,加载并实例化带有@Bean注解的类。
     *
     * @param fileParent 当前需要扫描的文件夹或文件
     */
    private void loadBean(File fileParent) {
        if (fileParent.isDirectory()) {
            File[] childrenFiles = fileParent.listFiles();
            if (childrenFiles == null || childrenFiles.length == 0) {
                return;
            }
            for (File child : childrenFiles) {
                if (child.isDirectory()) {
                    // 递归扫描子文件夹
                    loadBean(child);
                } else {
                    // 处理.class文件,转换为类全名并加载
                    String pathWithClass = child.getAbsolutePath().substring(rootPath.length() - 1);
                    if (pathWithClass.contains(".class")) {
                        String fullName = pathWithClass.replaceAll("\\\\", ".").replace(".class", "");
                        try {
                            Class<?> aClass = Class.forName(fullName);
                            if (!aClass.isInterface()) {
                                Bean annotation = aClass.getAnnotation(Bean.class);
                                if (annotation != null) {
                                    Object instance = aClass.newInstance();
                                    // 判断是否有接口,将接口或类本身作为键
                                    Class<?> key = aClass.getInterfaces().length > 0 ? aClass.getInterfaces()[0] : aClass;
                                    System.out.println("正在加载【" + key.getName() + "】,实例对象是:" + instance.getClass().getName());
                                    BeanFactory.put(key, instance);
                                }
                            }
                        } catch (ClassNotFoundException | IllegalAccessException | InstantiationException e) {
                            e.printStackTrace();
                        }
                    }
                }
            }
        }
    }

}
1
2
3
4
5
6
7
8
9
10
11
12
13
14
15
16
17
18
19
20
21
22
23
24
25
26
27
28
29
30
31
32
33
34
35
36
37
38
39
40
41
42
43
44
45
46
47
48
49
50
51
52
53
54
55
56
57
58
59
60
61
62
63
64
65
66
67
68
69
70
71
72
73
74
75
76
77
78
79
80
81
82
83
84
85
86
87
88
89
90
91
2
3
4
5
6
7
8
9
10
11
12
13
14
15
16
17
18
19
20
21
22
23
24
25
26
27
28
29
30
31
32
33
34
35
36
37
38
39
40
41
42
43
44
45
46
47
48
49
50
51
52
53
54
55
56
57
58
59
60
61
62
63
64
65
66
67
68
69
70
71
72
73
74
75
76
77
78
79
80
81
82
83
84
85
86
87
88
89
90
91
- 构造方法:使用指定的包名进行初始化,扫描该包及其子包下的所有类。对于找到的每一个类文件,如果它被
@Bean注解标记,则实例化它并将实例存储在BeanFactory中。 - loadBean:递归方法,用于从指定的文件夹开始扫描和加载类。对于每个类文件,它首先转换文件路径为类的全名,检查类是否有
@Bean注解,并根据结果创建对象实例。 - HashMap:用于存储类型到实例的映射,允许通过类型查找实例。
# 6. Java类标识 Bean 注解
@Bean
public class UserServiceImpl implements UserService
1
2
2
@Bean
public class UserDaoImpl implements UserDao
1
2
2
# 7. 测试 Bean 加载
package com.scholar.springIoc;

import org.junit.jupiter.api.Test;

/**
 * 测试类,用于验证自定义注解驱动的ApplicationContext是否正确工作。
 */
public class SpringXMLTest {

    /**
     * 测试方法,用于演示使用AnnotationApplicationContext加载并使用UserService。
     */
    @Test
    public void testXML() {
        // 创建ApplicationContext实例,指定包名为 'com.scholar.springIoc',这是Bean扫描的基础包
        ApplicationContext applicationContext = new AnnotationApplicationContext("com.scholar.springIoc");

        // 从ApplicationContext中获取UserService的Bean实例
        UserService userService = (UserService)applicationContext.getBean(UserService.class);

        // 调用UserService的out方法,这里假设UserService中定义了一个out方法,用于输出一些信息或执行业务逻辑
        userService.out();

        // 输出信息到控制台,表明测试运行成功
        System.out.println("run success");
    }
}package com.scholar.springIoc;

import org.junit.jupiter.api.Test;

/**
 * 测试类,用于验证自定义注解驱动的ApplicationContext是否正确工作。
 */
public class SpringXMLTest {

    /**
     * 测试方法,用于演示使用AnnotationApplicationContext加载并使用UserService。
     */
    @Test
    public void testXML() {
        // 创建ApplicationContext实例,指定包名为 'com.scholar.springIoc',这是Bean扫描的基础包
        ApplicationContext applicationContext = new AnnotationApplicationContext("com.scholar.springIoc");

        // 从ApplicationContext中获取UserService的Bean实例
        UserService userService = (UserService)applicationContext.getBean(UserService.class);

        // 调用UserService的out方法,这里假设UserService中定义了一个out方法,用于输出一些信息或执行业务逻辑
        userService.out();

        // 输出信息到控制台,表明测试运行成功
        System.out.println("run success");
    }
}
1
2
3
4
5
6
7
8
9
10
11
12
13
14
15
16
17
18
19
20
21
22
23
24
25
26
27
28
29
30
31
32
33
34
35
36
37
38
39
40
41
42
43
44
45
46
47
48
49
50
51
52
53
2
3
4
5
6
7
8
9
10
11
12
13
14
15
16
17
18
19
20
21
22
23
24
25
26
27
28
29
30
31
32
33
34
35
36
37
38
39
40
41
42
43
44
45
46
47
48
49
50
51
52
53
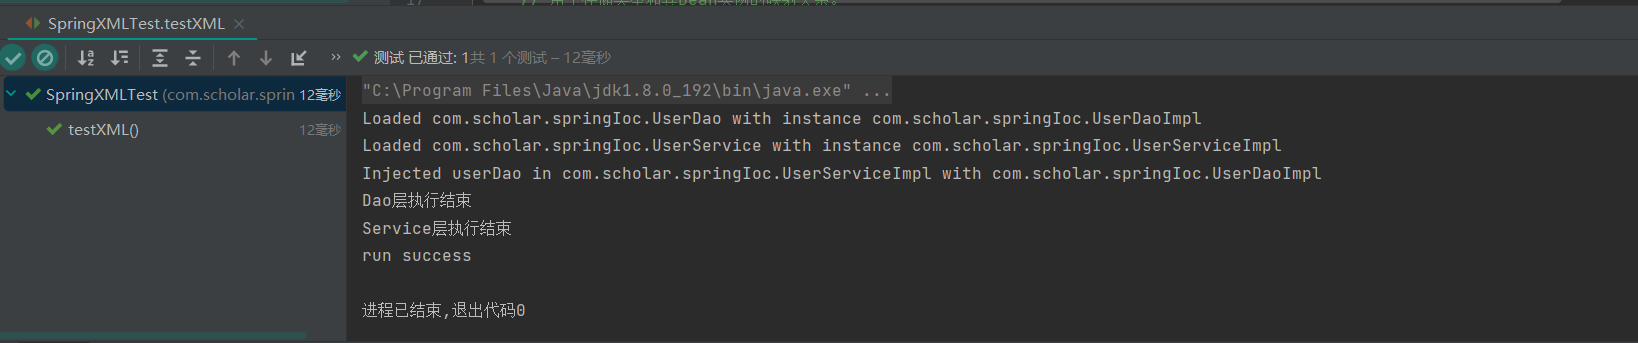
控制台打印测试
# 8. 依赖注入
只要 userDao.print(); 调用成功,说明就注入成功
package com.scholar.springIoc;

/**
 * 用户服务实现类,通过自定义注解@Bean标记为应用上下文管理的Bean。
 * 实现了UserService接口,提供了用户相关的业务逻辑处理。
 */
@Bean  // 使用自定义注解标记这个类为一个Bean,由自定义的ApplicationContext自动实例化和管理
public class UserServiceImpl implements UserService {

    @Di  // 使用自定义注解来实现依赖注入,注入UserDao的实例
    private UserDao userDao;

    /**
     * 实现UserService接口中的out方法。
     * 调用UserDao的print方法输出信息,并在控制台输出额外的消息表示服务层执行结束。
     */
    @Override
    public void out() {
        userDao.print();  // 调用注入的UserDao实例的print方法
        System.out.println("Service层执行结束");  // 输出额外的控制台信息
    }
}
1
2
3
4
5
6
7
8
9
10
11
12
13
14
15
16
17
18
19
20
21
22
2
3
4
5
6
7
8
9
10
11
12
13
14
15
16
17
18
19
20
21
22
执行第八步:报错了,说明当前 userDao 是个空对象

# 9. 依赖注入实现
package com.scholar.springIoc;

import java.io.File;
import java.net.URL;
import java.net.URLDecoder;
import java.util.Enumeration;
import java.util.HashMap;
import java.util.Map;
import java.lang.reflect.Field;

/**
 * 自定义的应用程序上下文,使用注解来自动装配和管理Bean。
 * 这个类负责扫描指定包下的所有类,识别和实例化带有 @Bean 注解的类,并对带有 @Di 注解的字段进行依赖注入。
 */
public class AnnotationApplicationContext implements ApplicationContext {

    // 用于存储类型和其Bean实例的映射关系。
    private HashMap<Class, Object> BeanFactory = new HashMap<>();
    // 存储扫描的根路径。
    private static String rootPath;

    /**
     * 通过类的Class对象获取其对应的Bean实例。
     *
     * @param clazz 要获取的Bean的Class类型。
     * @return 返回Bean的实例,如果不存在则返回null。
     */
    @Override
    public Object getBean(Class clazz) {
        return BeanFactory.get(clazz);
    }

    /**
     * 构造方法,初始化ApplicationContext,扫描指定包名下所有类,并加载标记为@Bean的类。
     *
     * @param basePackage 需要扫描的基本包名。
     */
    public AnnotationApplicationContext(String basePackage) {
        try {
            // 将包路径转换为文件目录路径格式。
            String packageDirName = basePackage.replaceAll("\\.", "\\\\");
            // 获取当前线程的类加载器,并加载指定包名下的所有资源。
            Enumeration<URL> dirs = Thread.currentThread().getContextClassLoader().getResources(packageDirName);
            while (dirs.hasMoreElements()) {
                URL url = dirs.nextElement();
                // 解码获取到的URL路径。
                String filePath = URLDecoder.decode(url.getFile(), "utf-8");
                // 设置根路径。
                rootPath = filePath.substring(0, filePath.length() - packageDirName.length());
                // 加载Bean。
                loadBean(new File(filePath));
            }
        } catch (Exception e) {
            throw new RuntimeException("Failed to scan package " + basePackage, e);
        }
        // 加载依赖注入。
        loadDi();
    }

    /**
     * 递归地扫描文件夹,加载并实例化带有@Bean注解的类。
     *
     * @param fileParent 当前需要扫描的文件夹或文件。
     */
    private void loadBean(File fileParent) {
        if (fileParent.isDirectory()) {
            File[] childrenFiles = fileParent.listFiles();
            if (childrenFiles == null || childrenFiles.length == 0) {
                return;
            }
            for (File child : childrenFiles) {
                if (child.isDirectory()) {
                    loadBean(child);  // 递归调用以处理子目录。
                } else {
                    // 获取文件的绝对路径,并将其转换为全类名。
                    String pathWithClass = child.getAbsolutePath().substring(rootPath.length() - 1);
                    // 确认是类文件。
                    if (pathWithClass.contains(".class")) {
                        // 转换为完整类名。
                        String fullName = pathWithClass.replaceAll("\\\\", ".").replace(".class", "");
                        try {
                            Class<?> aClass = Class.forName(fullName);
                            if (!aClass.isInterface() && aClass.getAnnotation(Bean.class) != null) {
                                // 创建类的实例。
                                Object instance = aClass.newInstance();
                                // 使用类或接口作为键存入HashMap。
                                Class<?> key = aClass.getInterfaces().length > 0 ? aClass.getInterfaces()[0] : aClass;
                                BeanFactory.put(key, instance);
                                System.out.println("Loaded " + key.getName() + " with instance " + instance.getClass().getName());
                            }
                        } catch (ClassNotFoundException | IllegalAccessException | InstantiationException e) {
                            e.printStackTrace();
                        }
                    }
                }
            }
        }
    }

    /**
     * 遍历所有实例化的Bean,为带有@Di注解的字段注入依赖。
     */
    private void loadDi() {
        for (Map.Entry<Class, Object> entry : BeanFactory.entrySet()) {
            Object obj = entry.getValue();
            Class<?> aClass = obj.getClass();
            Field[] declaredFields = aClass.getDeclaredFields();
            for (Field field : declaredFields) {
                Di annotation = field.getAnnotation(Di.class);
                if (annotation != null) {
                    field.setAccessible(true);
                    try {
                        // 获取字段类型对应的实例,并设置字段值。
                        Object valueToInject = BeanFactory.get(field.getType());
                        field.set(obj, valueToInject);
                        System.out.println("Injected " + field.getName() + " in " + obj.getClass().getName() + " with " + valueToInject.getClass().getName());
                    } catch (IllegalAccessException e) {
                        e.printStackTrace();
                    }
                }
            }
        }
    }
}
1
2
3
4
5
6
7
8
9
10
11
12
13
14
15
16
17
18
19
20
21
22
23
24
25
26
27
28
29
30
31
32
33
34
35
36
37
38
39
40
41
42
43
44
45
46
47
48
49
50
51
52
53
54
55
56
57
58
59
60
61
62
63
64
65
66
67
68
69
70
71
72
73
74
75
76
77
78
79
80
81
82
83
84
85
86
87
88
89
90
91
92
93
94
95
96
97
98
99
100
101
102
103
104
105
106
107
108
109
110
111
112
113
114
115
116
117
118
119
120
121
122
123
124
执行第八步:执行成功,依赖注入成功。
编辑此页 (opens new window)
上次更新: 2024/12/28, 18:32:08