 Spring6 - 国际化
# 1. i18n 概述
国际化也称作 i18n,其来源是英文单词 internationalization 的首末字符 i 和 n,18 为中间的字符数。由于软件发行可能面向多个国家,对于不同国家的用户,软件显示不同语言的过程就是国际化。通常来讲,软件中的国际化是通过配置文件来实现的,假设要支撑两种语言,那么就需要两个版本的配置文件。
# 2. Java 国际化
Java 自身是支持国际化的,Java.util.Locale 用于指定当前用户所属的语言环境等信息,Java.util.ResourceBundle 用于查找绑定对应的资源文件。Locale 包含了 language 信息和 country 信息,Locale 创建默认 locale 对象时使用的静态方法:
    /**
     * This method must be called only for creating the Locale.*
     * constants due to making shortcuts.
     */
    private static Locale createConstant(String lang, String country) {
        BaseLocale base = BaseLocale.createInstance(lang, country);
        return getInstance(base, null);
    }
2
3
4
5
6
7
8
配置文件命名规则:basename_language_country.properties。
必须遵循以上的命名规则,Java 才会识别。其中,basename 是必须的,语言和国家是可选的。这里存在一个优先级概念,如果同时提供了 messages.properties 和 messages_zh_CN.propertes 两个配置文件,如果提供的 locale 符合 en_CN,那么优先查找 messages_en_CN.propertes 配置文件,如果没查找到,再查找 messages.properties 配置文件。最后,提示下,所有的配置文件必须放在 classpath 中,一般放在 resources 目录下
实验:演示 Java 国际化
第一步:创建子模块 Spring6-i18n,引入 Spring 依赖

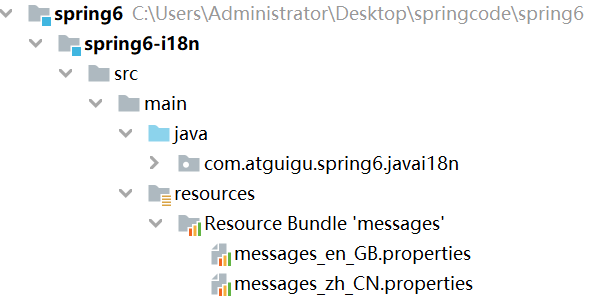
第二步:在 resource 目录下创建两个配置文件:messages_zh_CN.properties 和 messages_en_GB.properties

第三步:测试
import java.nio.charset.StandardCharsets;
import java.util.Locale;
import java.util.ResourceBundle;

public class Demo1 {

    public static void main(String[] args) {
        System.out.println(ResourceBundle.getBundle("messages",
                new Locale("en","GB")).getString("test"));

        System.out.println(ResourceBundle.getBundle("messages",
                new Locale("zh","CN")).getString("test"));
    }
}
2
3
4
5
6
7
8
9
10
11
12
13
14

# 3. Spring6 国际化
# MessageSource 接口
Spring 中国际化是通过 MessageSource 这个接口来支持的。
常见实现类
ResourceBundleMessageSource
这个是基于 Java 的 ResourceBundle 基础类实现,允许仅通过资源名加载国际化资源。
ReloadableResourceBundleMessageSource
这个功能和第一个类的功能类似,多了定时刷新功能,允许在不重启系统的情况下,更新资源的信息。
StaticMessageSource
它允许通过编程的方式提供国际化信息,一会我们可以通过这个来实现db中存储国际化信息的功能。
# 使用 Spring6 国际化
第一步:创建资源文件
国际化文件命名格式:基本名称_ 语言_ 国家.properties
{0},{1} 这样内容,就是动态参数

创建 scholar_en_US.properties
www.scholar.com=welcome {0},时间:{1}
创建 scholar_zh_CN.properties
www.scholar.com=欢迎 {0},时间:{1}
第二步:创建 Spring 配置文件,配置 MessageSource
<?xml version="1.0" encoding="UTF-8"?>
<beans xmlns="http://www.springframework.org/schema/beans"
       xmlns:xsi="http://www.w3.org/2001/XMLSchema-instance"
       xsi:schemaLocation="http://www.springframework.org/schema/beans
        http://www.Springframework.org/schema/beans/spring-beans.xsd">

    <bean id="messageSource"
          class="org.springframework.context.support.ResourceBundleMessageSource">
        <property name="basenames">
            <list>
                <value>scholar</value>
            </list>
        </property>
        <property name="defaultEncoding">
            <value>utf-8</value>
        </property>
    </bean>
</beans>
2
3
4
5
6
7
8
9
10
11
12
13
14
15
16
17
18
第三步:创建测试类
import org.springframework.context.ApplicationContext;
import org.springframework.context.support.ClassPathXmlApplicationContext;

import java.util.Date;
import java.util.Locale;

public class Demo2 {

    public static void main(String[] args) {

        ApplicationContext context = new ClassPathXmlApplicationContext("bean.xml");

        // 传递动态参数,使用数组形式对应 {0} {1} 顺序
        Object[] objs = new Object[]{"scholar",new Date().toString()};

        // www.scholar.com 为资源文件的 key 值
        // objs 为资源文件 value 值所需要的参数,Local.CHINA 为国际化为语言
        String str=context.getMessage("www.scholar.com", objs, Locale.CHINA);
        System.out.println(str);
    }
}
2
3
4
5
6
7
8
9
10
11
12
13
14
15
16
17
18
19
20
21

